


Time for the next big feature in our “DeskSculpt Inc” office rental application. Let us continue our work from the previous tutorial. If for some reason you haven’t completed the previous tutorial we encourage you to do so. If however you want to start with this tutorial, no problem you can easily get the resulting application of the previous tutorial from “The Hub” by installing “NoCode-Xcelerate #2”.
In this tutorial we aim to create a detail page for our Office rental application. We will do this by leveraging the “Vanilla cards” plugin that can be installed from “The Hub” and combining this with our existing office data-format.
Lets begin with the fun stuff
Lets start by designing our detail page. This page will contain a landscape image specific to the office, it will also contain a card with the main information of that office space and 3 extra cards to visualize the capacity, price & rating. Let’s start building!
- Open up the “ROOT” template and use the Hierarchy view to create another child (just like in tutorial #1)
- Give this new template a descriptive name: “Office detail”
- Give this template the following path: “offices/detail”
Head over to “The Hub” and install the “Vanilla cards” plugin. This plugin contains several cards that you can use to design your pages. In this tutorial we will use 2 types of cards this plugin offers: “the detail card” & “the mini card”. Lets use them in our “Office detail” template.
- Open up the “Office detail” template
- Use the “Components” section in the “Tool pane” to drag & drop a new image component on the page
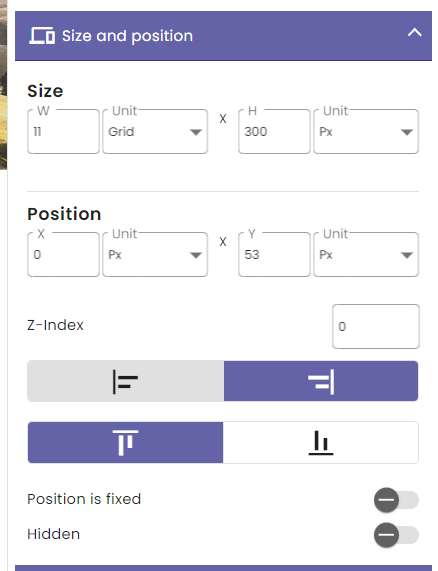
- Size this component
- Width: 11 grid
- Height: 300 px
- Position this component
- x: 0 px
- y: 53 px
- Align it to the right
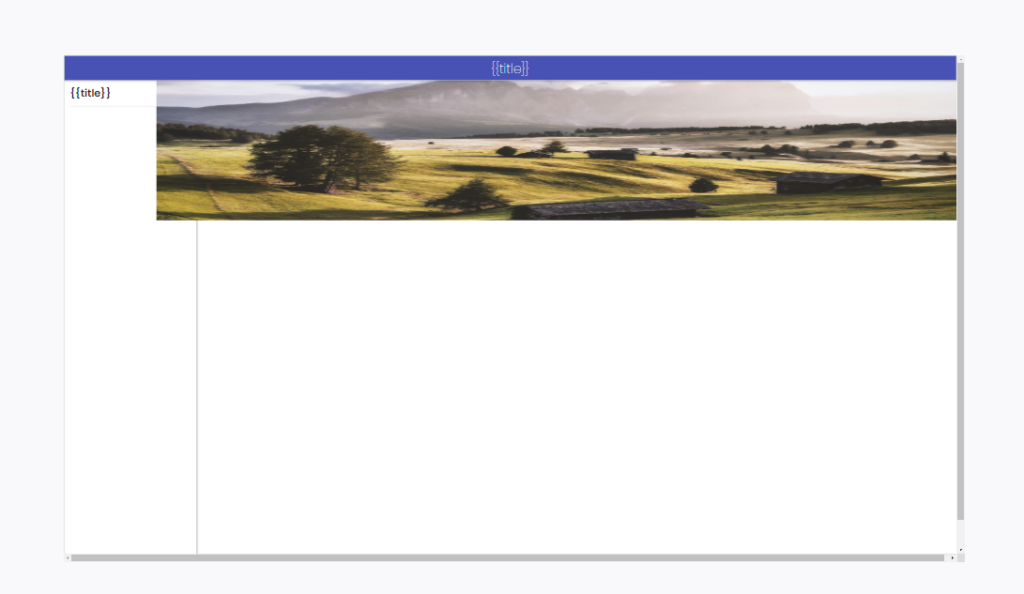
You might have spotted that this image component overlaps with your side navigation. If you have a hard time seeing it just put a temporary image in the image component, either by uploading it to the media library or just using an url to a publicly available image online;
Luckily we can easily fix this by setting the z-index of a component. z-index determines the elevation of a component compared to other components, a component with a higher z-index will appear on top of a component with a lower z-index. In this case we have to change the z-index of the sidenavigation, while we could change this within the “Office detail” page it is much better for us to maintain these components in the “Root” template because then all changes will be propagated down to all of the ROOTS’ children.
- Open up the “ROOT” template
- Select the sidenavigation component
- Open up “Component” section in the “Tool pane“
- Open up the “Style” tab
- Change the “Z-Index” to a value of 100
While we are here we might as well make sure the toolbar component always appears above the side navigation by setting its Z-Index to 200. Now lets go back to our “Office detail” page and you will notice the image now is tucked away underneath the sidenavigation.
Depending on which image you chose as a temporary image it might look a bit stretched. To solve this we can play around with the “Fit-image” setting on images. This will allow different modes of resizing images to fit in their container:
- Select the “Image” component
- Open up the “Component” section within the “Tool pane” head over to the “Style tab” and open up the “Image” section.
- Adjust “Fit image” to “Cover”
- Adjust Z-index: 10
Now preview your page:
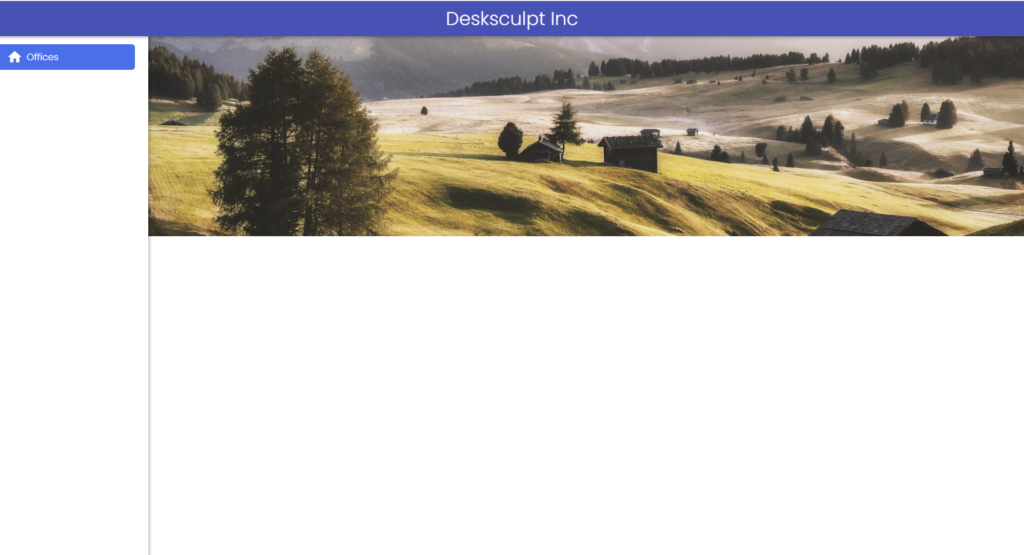
This is looking better already! Now lets place the detail cards on this page so we can visualize some of that office data.
- Open up the “Components” section in the “Tool pane“
- Find the “Template” component, drag & drop this on your page.
- Select “Detail card component” as the template:
- Set the image parameter to: {{DATA.body.image}}
- Set the title parameter to: {{DATA.body.name}}
- Set the subtitle parameter to: {{DATA.body.subtitle}}
- Set the button_text parameter to: Book this office
- Set the description_title parameter to: More information
- Set the description parameter to : {{DATA.body.description}}
- Size the component
- Width: 9 grid
- Height: 380 px
- Position the component:
- x: 2 grid
- y: 250 px
- Z-index: 20 (So that it definitely overlaps the landscape image)
- First mini card
- width: 3 (grid)
- height: 120 (px)
- x: 2 (grid)
- y: 630 (px)
- Second mini card
- width: 3 (grid)
- height: 120 (px)
- x: 5 (grid)
- y: 630 (px)
- Third mini card
- width: 3 (grid)
- height: 120 (px)
- x: 8 (grid)
- y: 630 (px)
Also add the following properties:
- First mini card
- image: https://cdn4.iconfinder.com/data/icons/company-structure-5/64/capacity-company-organization-corporate-management-512.png
- title: {{DATA.body.capacity}}
- Second mini card
- image: https://cdn-icons-png.flaticon.com/512/5396/5396225.png
- title: € {{DATA.body.price}}
- Third mini card
- image: https://cdn4.iconfinder.com/data/icons/feedback-and-rating/100/feedback-13-512.png
- title: {{DATA.body.reviewScore}}
Link it up!
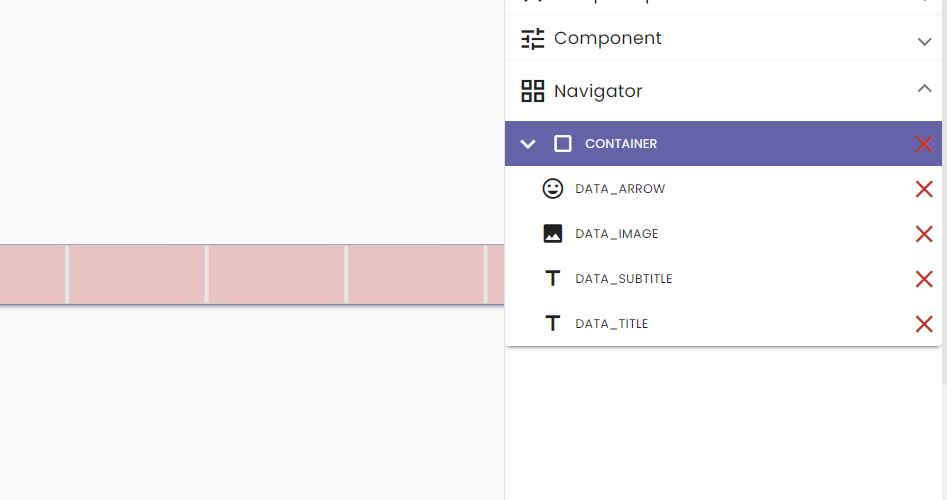
Now that your detail page is designed, lets link from our overview page that we created in tutorial #2 to our detail page. Head to the “Office overview item” template. This template was built by using a “Simple container” component as a container for the other components within this template. This component overlaps the entire template and we want to use it to execute logic whenever this component is clicked. In order to do so we need to select this “Simple container“, sometimes when components overlap eachother they are hard to select using a visual editor. That’s why we’ve created the “Navigator“. You will find the “Navigator” at the bottom of the “Tool pane“. It shows a hierarchical structure of the components within your template. Select the component “CONTAINER“.
- Open “Component” in the “Tool pane“
- Open up the “Actions” tab
- Click the “+” icon to add a new action and link it to the “On Click” trigger for this component, click the “pencil” button to edit.
- Give the new action a descriptive name “GOTO Office detail“
Defining parameters is a big thing within NoCode-X. It allows you to share data between Actions, templates, api’s, etc. We encourage you to read up on “Template parameters” and “Action parameters” to get an idea of what you can do with parameters within NoCode-X.
Whenever an action is called from a template, either by a trigger (e.g. “on load”) on the template it self or by a trigger (e.g. “on click”) on one of the components on that template. That action can possibly inherit the data passed to the template through parameters as long as the action has a parameter of the same name and the same type defined. Our “Office item” template has one parameter “DATA” of type “Data”. Let us make sure our new “Action” inherits this “DATA” parameter.
Open up “Action parameters”, normally you should see a notification that parameters were detected in entities calling this action. You can click this message.
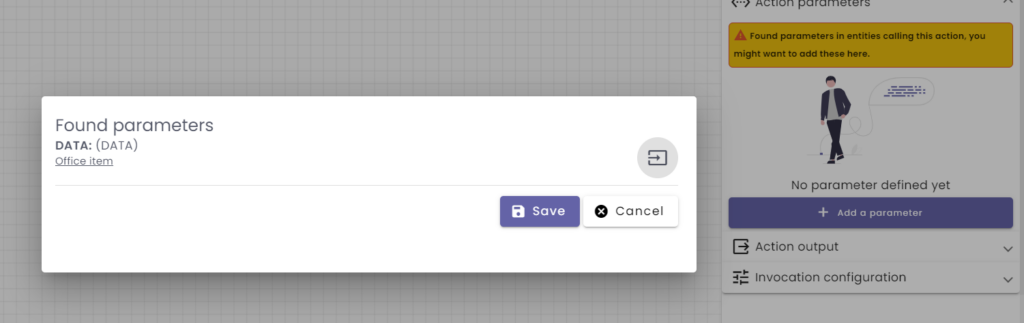
A popup shows up listing all parameters detected and where they come from. In our case that should be only one “DATA“, you can simply click on the add icon next to the parameter and on save to add it to you action.
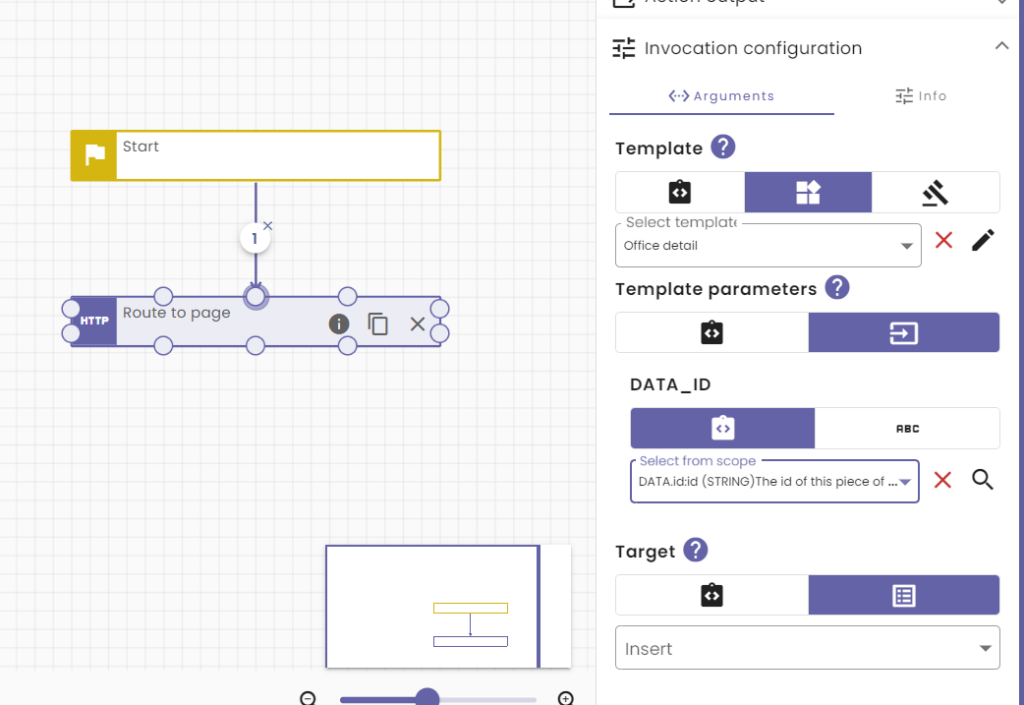
Now that we have our parameter, all we need to do is add the logic to redirect to our detail page. We can do this by adding a “Route to page” function just like we did in tutorial #1. This time however choose “Office detail” as the template to redirect to.
The “Office detail” template needs to “know” which office to display, therefore we should share some data with “Office detail”, as previously mentioned this can be done using “Parameters”.
- Head over to the “Office detail” template
- Open up “Template parameters” in the “Tool pane“.
- Click “add a parameter”
- Give the parameter a type of “String” and a name of “DATA_ID“.
- Head back to the “GOTO Office detail” action
- You will see you can now pass some data along with the “Route to page” function.
- Select the “scope selector” & choose “DATA.id” from the dropdown.
Now its time to preview our application. Go to the “Offices template”, hit the preview button and click on one of the offices. We should be redirected to another page:
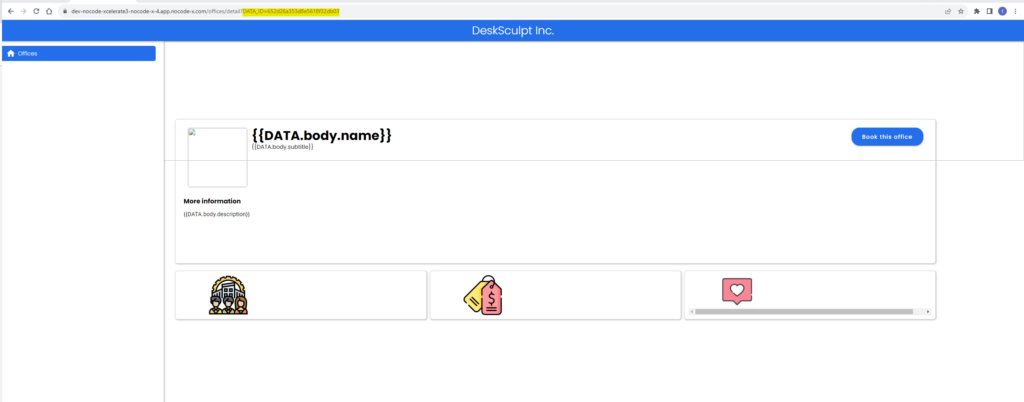
But hold on, none of the placeholders were replaced. If you think about it, it is logical because we only passed “DATA_ID” to the detail template not “DATA” and all the placeholders are set at “DATA….”, so they expect a variable called “DATA”. If you check the url of this page, you might notice that “DATA_ID” is present as parameter of the url, this is one of many ways of injecting data into pages within NoCode-X.
Okay so lets solve this then. Let us use the ID that is passed as a parameter in the url and look up the data in our built-in database and visualize it upon loading the page.
- Head over to the “Office detail” template
- Open up the “Template” tab in the “Tool pane”.
- Within this tab open up the “Actions” tab,
- Add an “on load” action by clicking the “+” button
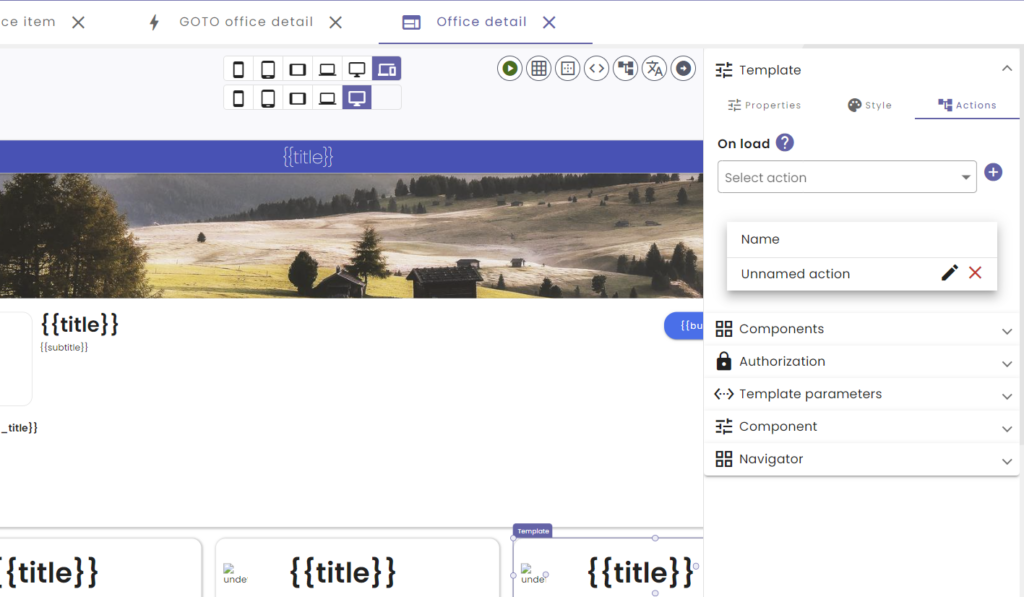
- Click the “pencil” icon next to the new action in order to edit it.
- Name your new action “Load office data“
- Add a parameter “DATA_ID” with type “String” (manually or use the message claiming you have parameters to inherit)
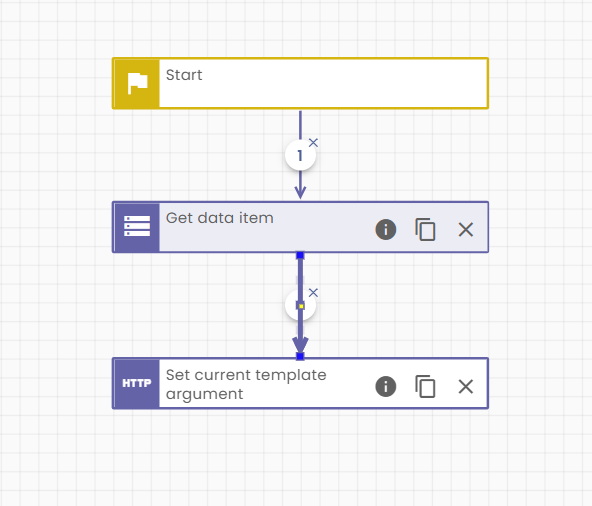
- Open up “Functions” in the “Tool pane” and locate the “Get data item” function
- Drag and drop this into your logic.
- Open the “Functions” section again and locate the “Set current template argument” function.
- Drag and drop this into your logic
- Connect your logic blocks as follows:
The first block can get a piece of data from the built-in database and make it available within the “Variable scope” of your action. To learn more about the action “Variable scope” we encourage you to read the documentation on this topiDAc.
Configure this block by clicking on it and opening the “Invocation configuration” in the “Tool pane” and providing the attributes as follows:
- For the Id attribute switch to the “Scope selector” and select “DATA_ID” from the dropdown
- As a value of the Data-format attribute choose “Office” from the dropdown.
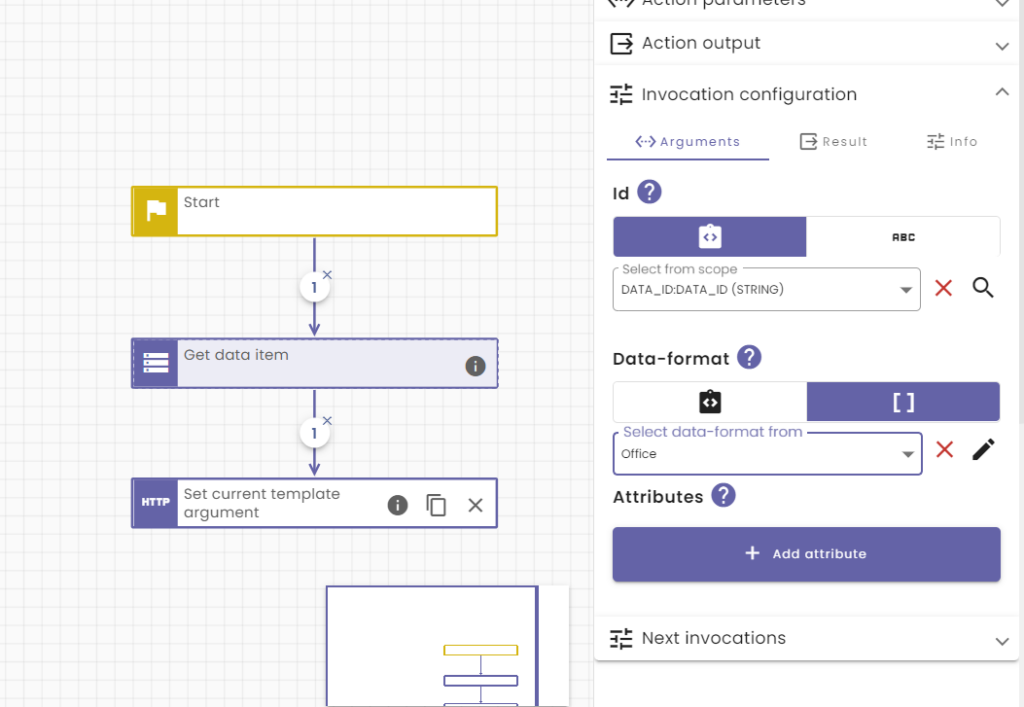
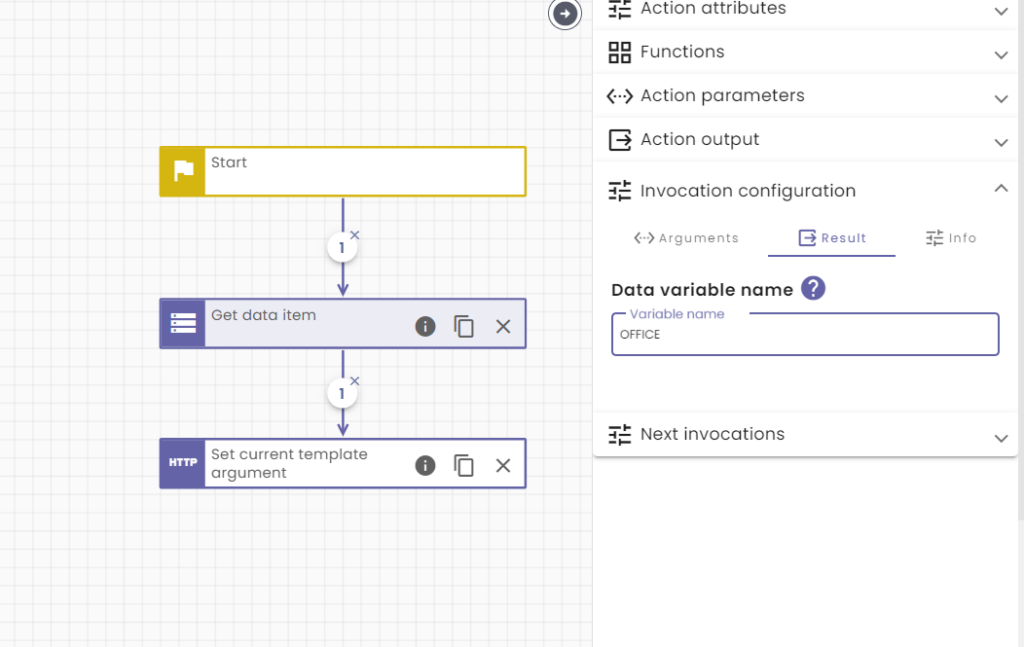
The function “Get data item” also returns a value which it writes to your “Variable scope“. The name of this value can be entered in the “Result tab“. Lets name it “OFFICE“.
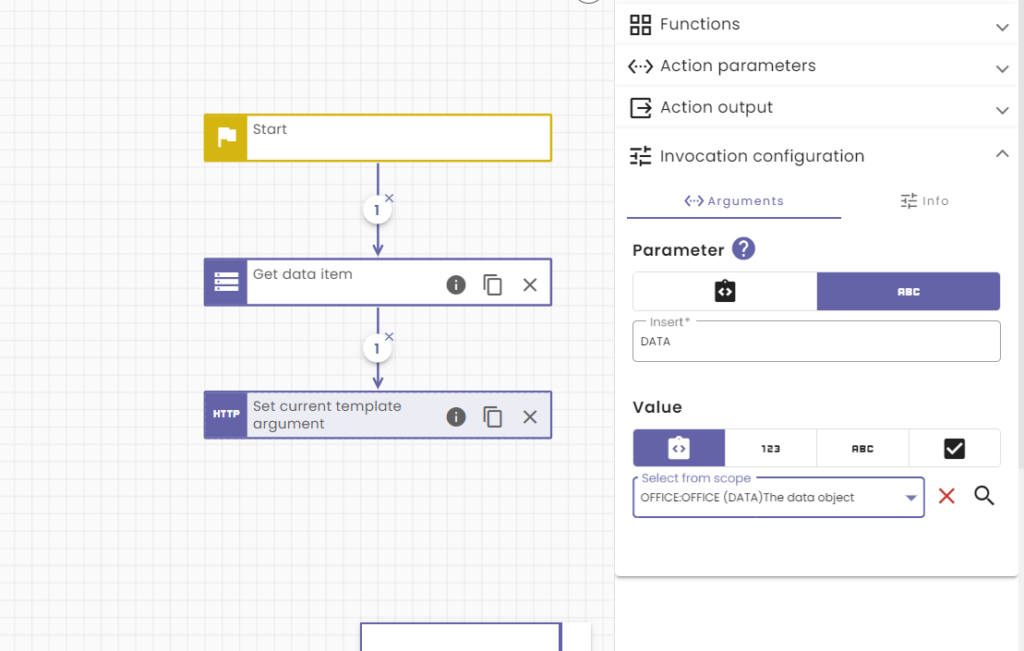
The “Set current template argument” function actually sets the value of a parameter defined on the template from which the current action is called. Of course this parameter has to exist before we can use this function.
- Head to the “Office detail” template
- Open up the “Template parameters” section in the “Tool pane“
- Create a parameter with, name “DATA”, type: “Data” and Date-format: “Office“
- Switch back to “Load office data” action
- Click on “Set current template argument” block
- Open up the “Invocation configuration” in the “Tool pane“
- Set the value of “Parameter” at “DATA”
- Switch to the “Scope selector” on “Value” and select “OFFICE” from the drop down
This should make the current Office data available upon loading the page. Lets test the page and see if it has worked:

This is starting to look good but we aren’t quite there yet. There are still some placeholders that arent replaced. This is because the data is simply not there. Our “Office” data-format does not have attributes called: subtitle, price, landscapeImage or reviewScore. Lets go ahead and add them.
- Go to the “Data-format” overview and open up the “Office” data-format.
- Open up the “Format” tab and add the following 4 attributes
- description (type: string)
- price (type: number)
- reviewScore (type: number)
- landscapeImage (type: string)
- Don’t forget to hit save to save your changes.
- Change your data as follows:
{
    "name": "Downtown Workspace",
    "subtitle": "Downtown Workspace: Where Innovation Meets the Heart of the City.",
    "description": "Downtown Workspace is your vibrant urban oasis for modern office solutions. Nestled in the heart of the city, our thoughtfully designed workspaces offer a dynamic environment where creativity thrives and collaboration blooms. Whether you're an entrepreneur, freelancer, or part of a growing team, our flexible office options cater to your unique needs. Enjoy the convenience of a prime downtown location, top-notch amenities, and a community that fuels your entrepreneurial spirit. Join us at Downtown Workspace and discover the ideal place to work, connect, and succeed.",
    "capacity": 75,
    "price": 1200,
    "reviewScore": 4.2,
    "image": "https://back.nocode-x.com/v2/media/file/company/6f3fa3cf-2c53-474f-912b-8b4109f59f7b/application/ae25edf4-541e-4cfb-a13c-680b5ecb98ff/40d99ab1-596f-4706-8fcd-571c5c1f5455",
    "landscapeImage": "https://back.nocode-x.com/cdn-cgi/image/width=2000,quality=75/v2/media/file/company/6f3fa3cf-2c53-474f-912b-8b4109f59f7b/application/ae25edf4-541e-4cfb-a13c-680b5ecb98ff/7db6f79a-7ef6-48e3-89ac-d7bfbd672d1f"
}
{
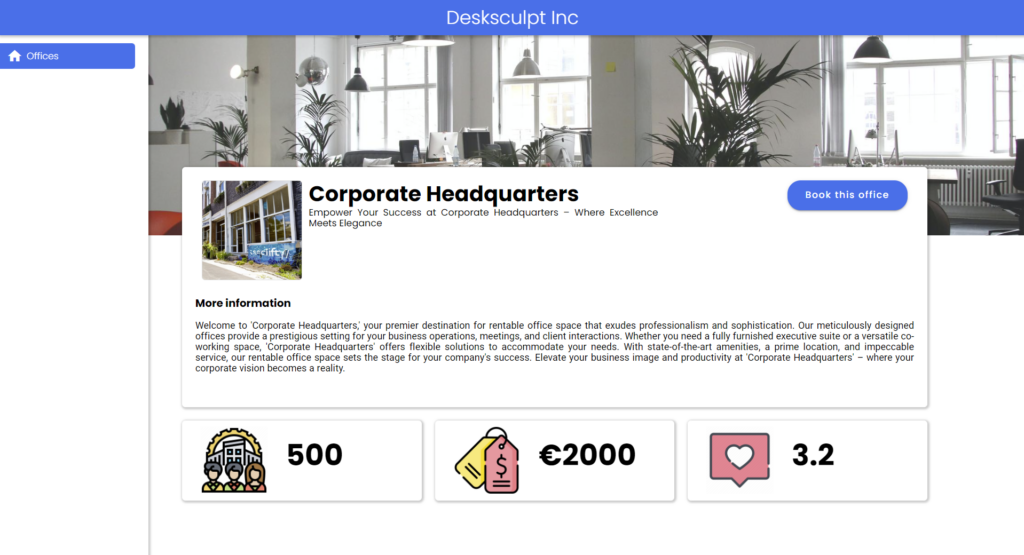
"name": "Corporate Headquarters",
"subtitle": "Empower Your Success at Corporate Headquarters – Where Excellence Meets Elegance",
"description": "Welcome to 'Corporate Headquarters,' your premier destination for rentable office space that exudes professionalism and sophistication. Our meticulously designed offices provide a prestigious setting for your business operations, meetings, and client interactions. Whether you need a fully furnished executive suite or a versatile co-working space, 'Corporate Headquarters' offers flexible solutions to accommodate your needs. With state-of-the-art amenities, a prime location, and impeccable service, our rentable office space sets the stage for your company's success. Elevate your business image and productivity at 'Corporate Headquarters' – where your corporate vision becomes a reality.",
"capacity": 500,
"price": 2000,
"reviewScore": 3.2,
"image": "https://back.nocode-x.com/v2/media/file/company/6f3fa3cf-2c53-474f-912b-8b4109f59f7b/application/ae25edf4-541e-4cfb-a13c-680b5ecb98ff/3b496425-9306-425c-8f83-276626df7205",
"landscapeImage": "https://back.nocode-x.com/cdn-cgi/image/width=2000,quality=75/v2/media/file/company/6f3fa3cf-2c53-474f-912b-8b4109f59f7b/application/ae25edf4-541e-4cfb-a13c-680b5ecb98ff/d51b5916-93d9-425e-9a32-69ed8b55679b"
}{
"name": "Cozy Corner Office",
"subtitle": "Cozy Corner Office: Where Comfort Meets Productivity.",
"description": "Cozy Corner Office is your intimate haven for focused work and quiet productivity. Tucked away in a tranquil corner of the city, our snug, well-appointed workspaces offer a peaceful retreat where you can get down to business in ultimate comfort. Whether you're a writer seeking solitude or a remote worker looking for a peaceful atmosphere, our inviting office spaces cater to your need for serenity. Experience the joy of a warm, welcoming environment, essential amenities, and a supportive community that fosters your best work. Join us at Cozy Corner Office, where your professional aspirations find a peaceful sanctuary.",
"capacity": 10,
"price": 800,
"reviewScore": 4.2,
"image": "https://back.nocode-x.com/v2/media/file/company/6f3fa3cf-2c53-474f-912b-8b4109f59f7b/application/ae25edf4-541e-4cfb-a13c-680b5ecb98ff/fdbceb8e-213e-47a4-b05f-ec89e8b7112c",
"landscapeImage": "https://back.nocode-x.com/cdn-cgi/image/width=2000,quality=75/v2/media/file/company/6f3fa3cf-2c53-474f-912b-8b4109f59f7b/application/ae25edf4-541e-4cfb-a13c-680b5ecb98ff/eabe29fc-cdaa-41fe-a1e6-8999906aa533"
}{
"name": "Tech Hub",
"subtitle": "Tech Hub: Where Innovation Drives the Future.",
"description": "Tech Hub is your dynamic epicenter for cutting-edge ideas and technological progress. Situated at the forefront of innovation, our state-of-the-art facilities provide the ideal environment for tech enthusiasts, startups, and forward-thinking businesses. Whether you're a software developer, an entrepreneur, or a tech disruptor, our collaborative spaces are designed to inspire breakthroughs and drive progress. Revel in the energy of a tech-savvy community, top-tier resources, and a space that's tailor-made for your tech-driven ambitions. Join us at Tech Hub and be at the heart of the innovation revolution.",
"capacity": 150,
"price": 1500,
"reviewScore": 4.2,
"image": "https://back.nocode-x.com/v2/media/file/company/6f3fa3cf-2c53-474f-912b-8b4109f59f7b/application/ae25edf4-541e-4cfb-a13c-680b5ecb98ff/96dea45c-a266-4631-b894-f84281a3a9d0",
"landscapeImage": "https://back.nocode-x.com/cdn-cgi/image/width=2000,quality=75/v2/media/file/company/6f3fa3cf-2c53-474f-912b-8b4109f59f7b/application/ae25edf4-541e-4cfb-a13c-680b5ecb98ff/2ceeb643-22a0-45dc-8f9e-eba5bbedf71c"
}{
"name": "Startup Innovators",
"subtitle": "Startup Innovators: Where Visionaries Ignite Success.",
"description": "Startup Innovators is the launchpad for aspiring entrepreneurs and visionaries poised to redefine industries. Positioned at the forefront of innovation, our vibrant workspace fuels the creative energy of startups and forward-thinking companies. Whether you're pioneering a game-changing app, developing the next big thing in tech, or driving innovation in any sector, our collaborative environment is where your breakthrough journey begins. Immerse yourself in the culture of innovation, foster valuable connections, and harness the resources you need to bring your groundbreaking ideas to life. Join us at Startup Innovators and set your startup dreams into motion.",
"capacity": 50,
"price": 600,
"reviewScore": 3.2,
"image": "https://back.nocode-x.com/v2/media/file/company/6f3fa3cf-2c53-474f-912b-8b4109f59f7b/application/ae25edf4-541e-4cfb-a13c-680b5ecb98ff/78034b7f-449a-4f7f-bfc6-05ff586d479a",
"landscapeImage": "https://back.nocode-x.com/cdn-cgi/image/width=2000,quality=75/v2/media/file/company/6f3fa3cf-2c53-474f-912b-8b4109f59f7b/application/ae25edf4-541e-4cfb-a13c-680b5ecb98ff/7f508f31-750d-40a1-978b-494cf2a18e4b"
}{
"name": "Green Oasis Office",
"subtitle": "Green Oasis Office: Where Sustainability Meets Success.",
"description": "Green Oasis Office offers a refreshing blend of eco-conscious workspace and professional excellence. Nestled within a lush, environmentally conscious setting, our offices provide a sustainable and inspiring work environment for businesses and individuals committed to making a positive impact. Whether you're an eco-entrepreneur, a sustainability advocate, or simply appreciate a greener workspace, our harmonious surroundings and eco-friendly amenities are designed to align with your values. Join us at Green Oasis Office and experience the perfect fusion of nature, productivity, and responsible business practices.",
"capacity": 30,
"price": 1800,
"reviewScore": 3.8,
"image": "https://back.nocode-x.com/v2/media/file/company/6f3fa3cf-2c53-474f-912b-8b4109f59f7b/application/ae25edf4-541e-4cfb-a13c-680b5ecb98ff/3984f277-b0dd-4d93-b238-c0876ea3d332",
"landscapeImage": "https://back.nocode-x.com/cdn-cgi/image/width=2000,quality=75/v2/media/file/company/6f3fa3cf-2c53-474f-912b-8b4109f59f7b/application/ae25edf4-541e-4cfb-a13c-680b5ecb98ff/08a24775-cd83-4e81-8ed2-67404d1d42c9"
}Lets preview our detail page:
And just like that our offices have gotten a nice detail page! Care for more action? Check out the next tutorial: NoCode-Xcelerate: Booking reservations
Did you notice that all plugins used within this tutorial were built by using NoCode-X? That’s right no code was used to build these plugins want to learn how to build plugins check out these tutorials:
- NoCode-Xpert: Building a reusable card component