


We are at it again with our “DeskSculpt Inc” office rental application. Let us continue our work from the previous tutorial and build a way for our users to actually book a reservation at an office space. If for some reason you haven’t completed the previous tutorials we encourage you to do so. If however you want to start with this tutorial, no problem you can easily get the resulting application of the previous tutorial from “The Hub” by installing “NoCode-Xcelerate #3”.
In this tutorial we aim to create a reservation form for our Office rental application. This form will store a reservation in the built-in database.
Lets dive right in.
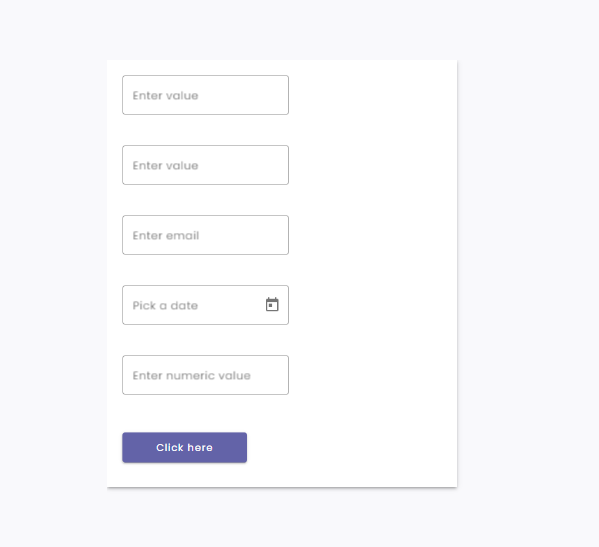
Lets start by designing our form page. This page will contain all the fields we need to create a reservation and a button to submit our request.
- Open up the “Template overview” and create a new template by clicking on “Create“.
- Choose “Reusable component” and language “en“.
- Give this new template a descriptive name: “Reservation form”
- Open up the style tab in the “Template” section of the “Tool pane” and size this template
- Width: 500 px
- Height: 610 px
- Don’t forget to disable authentication on this page (just like in tutorial #1).
- Open up the “Components” section in the “Tool pane“
- Find the component “Vertical list” and drag and drop this on the page
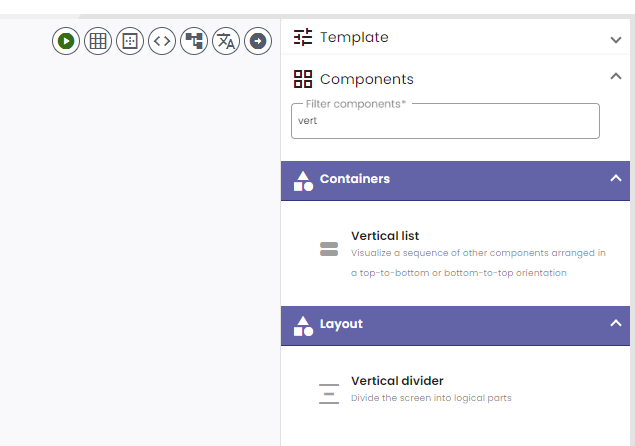
This component is what we call a “Container” component. A component that can contain other components. The vertical list stacks components vertically and is a perfect component to create a clean form. Lets start by positioning our “Vertical list” and then add other components to it.
- Select the vertical list and open the “Component” section in the “Tool pane“.
- Give this component a descriptive “Code“: “RESERVATION_FORM_WRAPPER”
- Open up the style tab
- Size
- Width: 100 %
- Height: 100 %
- Position:
- X: 0 px
- Y: 0 px
- Open up the “Components” section in the “Tool pane“
- Find the “Input field” component and drag 2 of these in the vertical list.
- Find the “Email field” component and drag 1 of these in the vertical list.
- Find the “Date field” component and drag 1 of these in the vertical list.
- Find the “Number field” component and drag 1 of these in the vertical list.
- Find the “Button” component and drag 1 of these in the vertical list.
Lets make all fields cover 100% of the vertical list. For each component do the following:
- Select the component
- Open up the “Component” section of the “Tool pane”
- Open up the “Style” tab
- Set a width of 100 %
Okay, thats a good start, now we can provide each field with a descriptive label and activate validation of our form. Form validation has been made extremely easy within NoCode-X. You might have noticed that we have a component for various types of input: “email”, “url”, “numbers”, etc… Each of these fields already have a basic set of validation rules inside them, which can be customized according to your needs. Of course good validation within an application comes in 2 forms: front-end validation and back-end validation. Validation on your form is considered “front-end” validation. Validation on the back-end can be achieved by enforcing rule on your data-format. We will cover this in detail in a later tutorial.
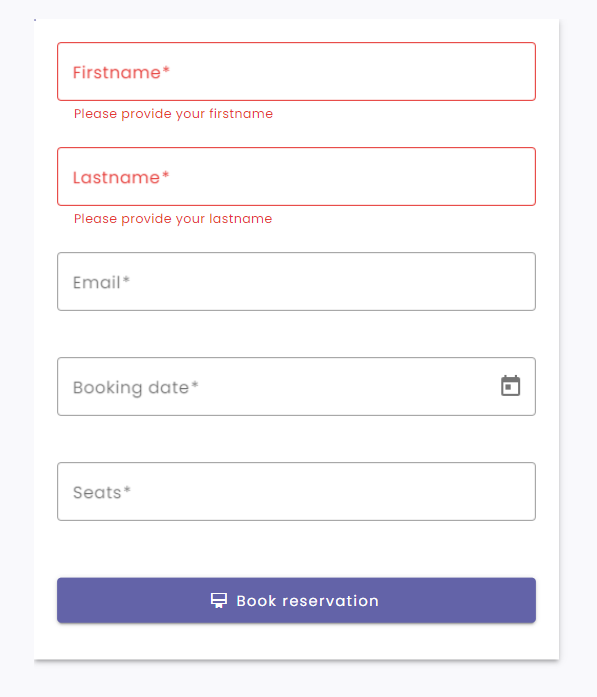
Firstname:
- Select the first “Input field” component in the list and open up the “Component” section in the “Tool pane“.
- Give it a descriptive “Code“: “FIRSTNAME”
- Give it a correct “Label“: “Firstname”
- Make this a “Mandatory” field
- Add “Please provide your firstname” as “Mandatory validation message“.
Lastname:
- Select the second “Input field” component in the list and open up the “Component” section in the “Tool pane“.
- Give it a descriptive “Code“: “LASTNAME”
- Give it a correct “Label“: “Lastname”
- Make this a “Mandatory” field
- Add “Please provide your lastname” as “Mandatory validation message“.
- Select the “Email field” component in the list and open up the “Component” section in the “Tool pane”.
- Give it a descriptive “Code“: “EMAIL”
- Give it a correct “Label“: “Email”
- Make this a “Mandatory” field
- Add “Please provide your email address” as “Mandatory validation message“.
- Select the “Date field” component in the list and open up the “Component” section in the “Tool pane“.
- Give it a descriptive “Code“: “DATE”
- Give it a correct “Label“: “Booking date”
- Make this a “Mandatory” field
- Add “Please provide the date of your booking” as “Mandatory validation message“.
- Select the “Number field” component in the list and open up the “Component” section in the “Tool pane“.
- Give it a descriptive “Code“: “NUMBER_OF_SEATS”
- Give it a correct “Label“: “Seats”
- Make this a “Mandatory” field
- Add “Please provide the amount of seats you wish to reserve” as “Mandatory validation message“.
- Select the “Button” component in the list and open up the “Component” section in the “Tool pane“.
- Give it a descriptive “Code“: “SUBMIT”
- Give it a correct “Label“: “Book reservation”
- Keep “Type” at submit form: This will make sure the validation rules are checked upon clicking this button.
- Choose a nice icon
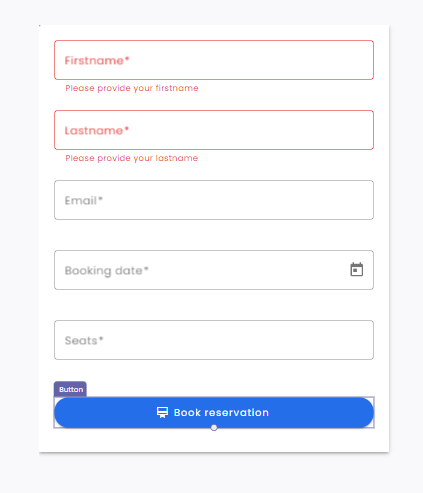
For each form field:
- Select the component and open up the “Component” section of the “Tool pane“.
- Open up the “Style” tab
- Under “Style” switch to “On focus” (This style will be used when the user has the cursor inside the element)
- Open up “Label font“
- Set font to “Poppins 16px”
- Set color to “#246ee9”
- Open up “Inputfield border”
- Set the color to “#246ee9”
For the button:
- Select the “Button” component and open up the “Component” section of the “Tool pane“
- Open up the “Style” tab
- Under “Style”
- Open up “Background“
- Set the background color to “#246ee9”
- Open up “Border“
- Set “Radius” to 20
Looks great, time to use it our application!
Link it up!
In tutorial #3 we have built a nice detail page for offices. On this detail page there is a button containing the text “Book this office”. Lets make our form appear when clicking this button.
- Head over to the “Office detail” page
- Select the “detail card” component
- Open up the “Component” section of the “Tool pane“
- Click the “+” button next to the input field of the parameter “button_action” to create a new action and link it.
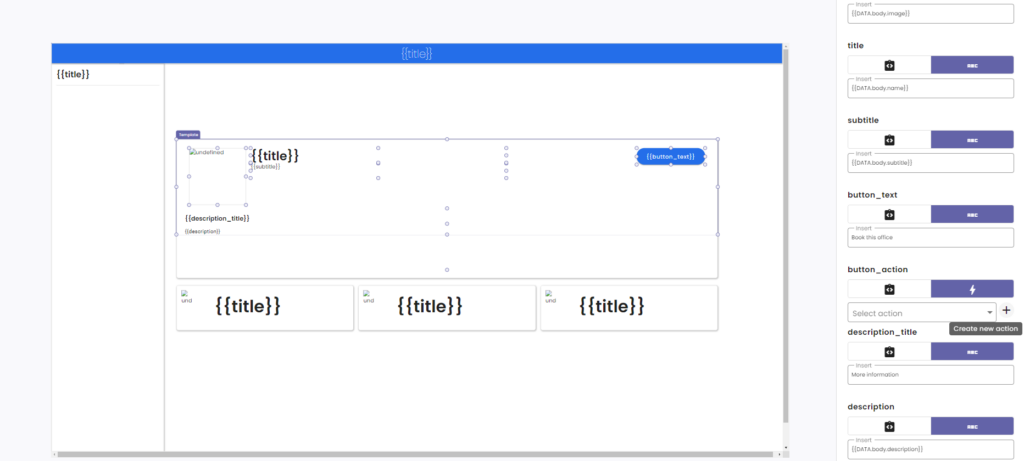
A new action appears. We want this action to load our form inside a dialog. This is really easy within NoCode-X and only requires a small amount of work. Lets dive in:
- Open up “Action attributes” section within the “Tool pane“.
- Give this action a descriptive name: “Open up booking form”
- Open up the “Functions” section and search for “Show a dialog“, drag and drop this in your action.
- Connect the start block to your “Show a dialog” block.
- Select the “Show a dialog” block and open up the “Invocation configuration” section in the “Tool pane”.
- As template select our “Reservation form” template
- Set Width to “500px”
- Set Height to “610px”
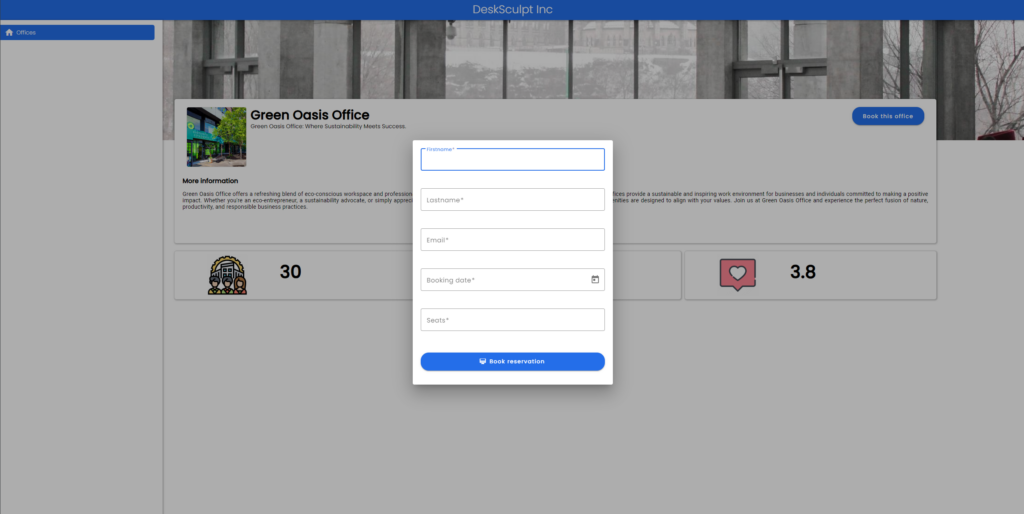
There we have it, a nice dialog showing our reservation form. Now lets make it save a reservation in our built in database.
Creating reservation data
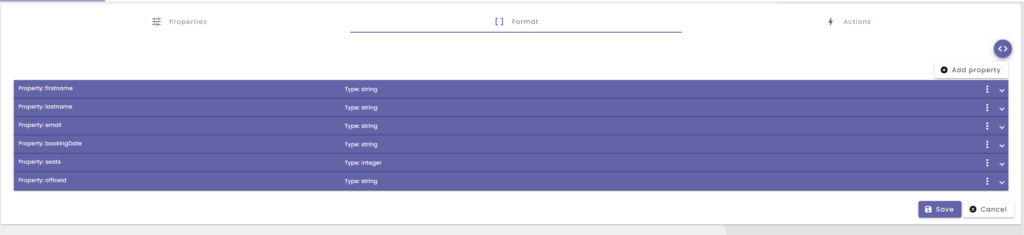
When we want to handle data within NoCode-X we should always start by defining a data-format. Lets create a data-format for our Reservation data and use this format to create reservations upon submitting our reservation form.
- Open up the Data-format overview and click “Create” to create a new Data-format
- Give this Data-format a descriptive name: “Reservation”
- Open up the “Format” tab and add some properties
- firstname
- name: firstname
- type: string
- lastname:
- name: lastname
- type: string
- email
- name: email
- type: string
- bookingDate
- name: bookingDate
- type: string
- seats
- name: seats
- type: integer
- officeId
- name: officeId
- type: string
- firstname
Don’t forget to hit “save” to completely save your Data-format.
Now that we have our “Reservation” Data-format in place, lets go ahead an make it possible to create some “Reservation” data.
- Head over to the “Reservation form” template.
- Select the “Book reservation” button
- Open up the “Component” section in the “Tool pane“
- Open up the “Actions” tab
- Click the “+” button to create an action and link it to this buttons’ “on click” trigger.
- Click the “pencil” next to the action to edit.
- Open the “Action attributes” section in the “Tool pane” and give this action a descriptive name: “Save reservation”
- Open up the “Functions” section in the “Tool pane” and drag the following functions in your actions.
- Get answer of input field (2X)
- Get answer of email field
- Get answer of date field
- Get answer of number field
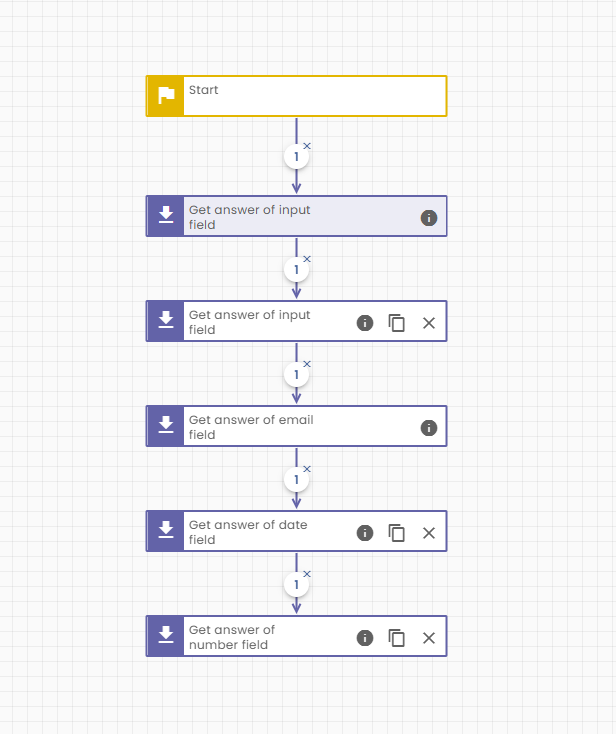
These functions will fetch the value inserted in your form and put them on the “Variable scope” ready for you to use within the next steps of our logic. The only thing we need to do for each of these functions is define from which “field” component the value should be fetched & define a name under which to store the value in the “Variable scope“.
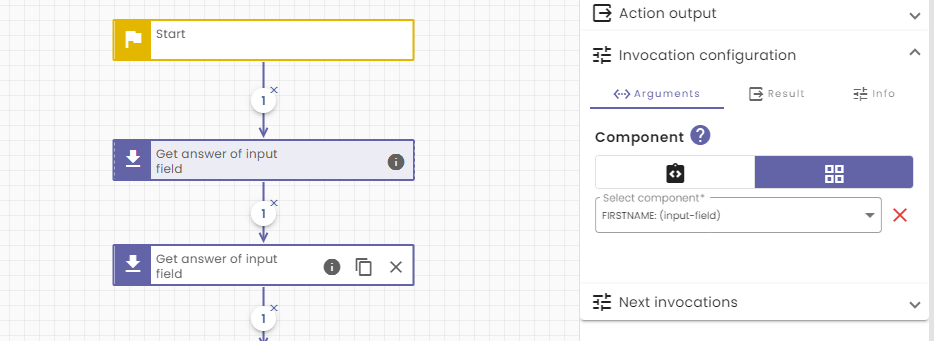
- Select the first “Get answer of input field” function
- Open up the “Invocation configuration”
- Select “FIRSTNAME” from de components dropdown list
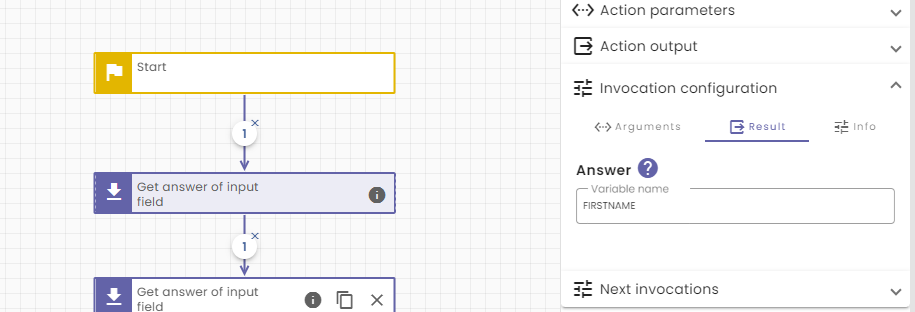
- Open up the “Result” tab
- Enter “FIRSTNAME” as answer.
Repeat this process for each of the functions with the Following data:
- Get answer of input field
- Component: LASTNAME
- Result: LASTNAME
- Get answer of email field
- Component: EMAIL
- Result: EMAIL
- Get answer of date field
- Component: DATE
- Result: DATE
- Get answer of number field
- Component: NUMBER_OF_SEATS
- Result: NUMBER_OF_SEATS
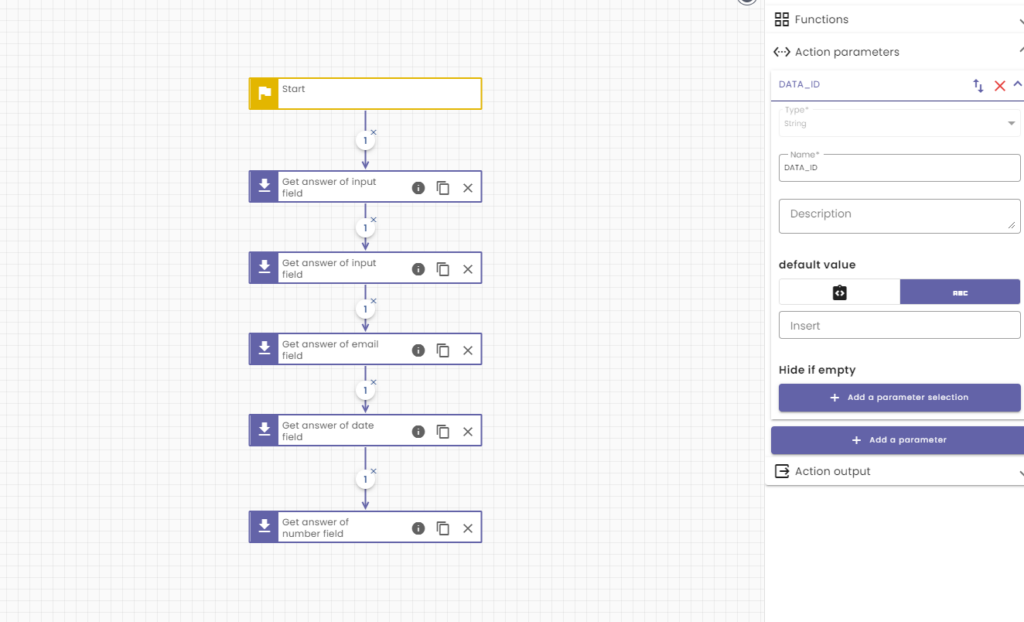
- Open up the “Action parameters” section in the “Tool pane“.
- Add a parameter with name: “DATA_ID” and type: “String“
Now that we have all the data we need sitting there in the “Variable scope” we can continue creating our reservation data. Lets start by creating a recognizable name for our piece of data. We will create the following “Office reservation for <EMAIL>”, which we can easily do by creating a string variable in this format:
- Open up the “Function” section in the “Tool pane“
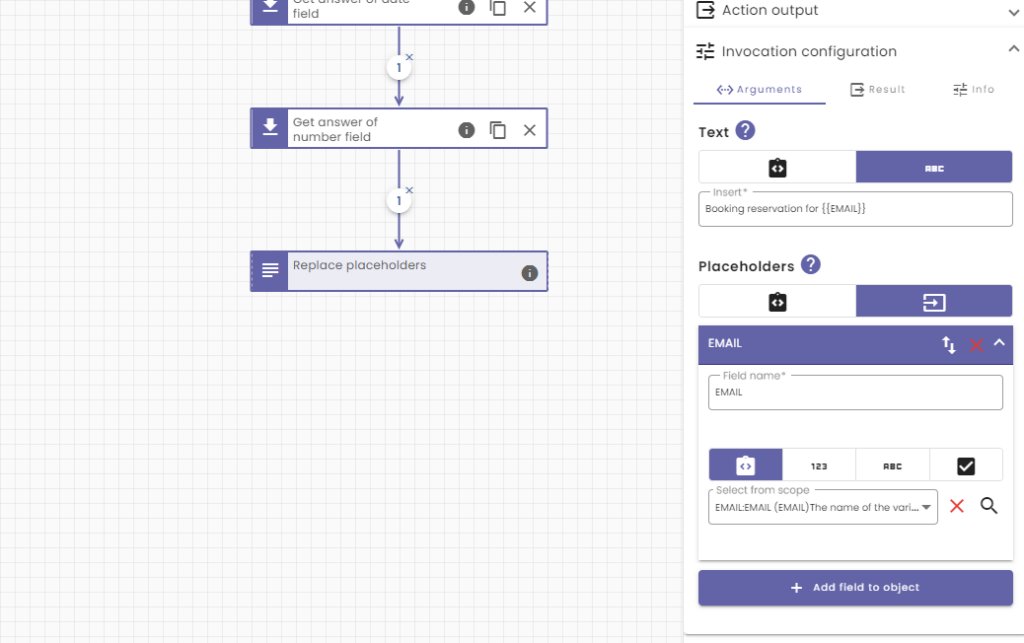
- Find “Replace placeholders” and drag it into your action.
- Hook it up to rest of your logic as last function.
- Select it and open up the “Invocation configuration“.
- Input “Office reservation for {{EMAIL}}” as “Text“
- Add a placeholder
- Field name: EMAIL
- Value: Select “EMAIL” from “Variable scope“.
- Open up the “Result” tab
- Set “BOOKING_NAME” as the Result.
Okay, time to write our data to the database.
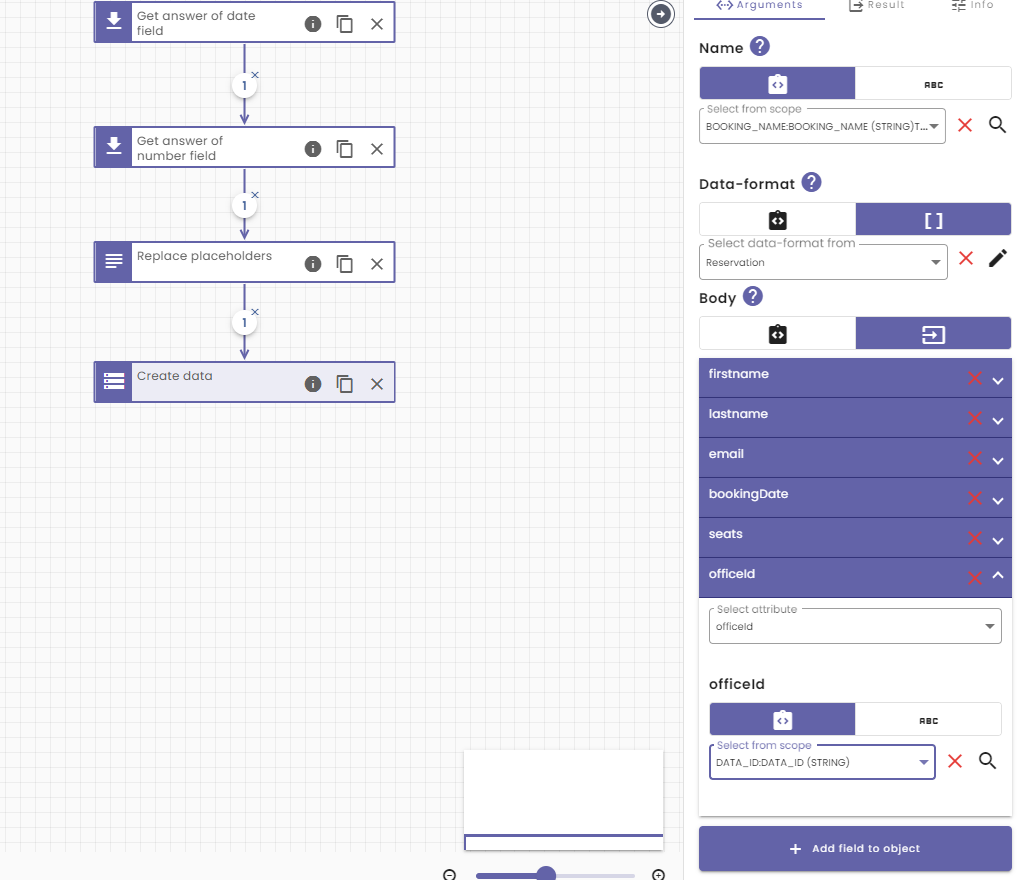
- Open up the “Functions” section of the “Tool pane” and search for “Create data“.
- Drag and drop this function into your action and hook it up as last block in the chain.
- Click on it and open the “Invocation configuration“.
- As “Name” select “BOOKING_NAME” from your “Variable scope“.
- Select “Reservation” as the data-format.
- And set the following fields of the body:
- Firstname
- Attribute: firstname
- Value: “FIRSTNAME” (from “Variable scope”)
- Lastname
- Attribute: lastname
- Value: “LASTNAME” (from “Variable scope”)
- Email
- Attribute: email
- Value: “EMAIL” (from “Variable scope”)
- Booking date
- Attribute: bookingDate
- Value: “DATE” (from “Variable scope”)
- Seats
- Attribute: seats
- Value: “NUMBER_OF_SEATS” (from the “Variable scope”)
- Office id
- Attribute: officeId
- Value: “DATA_ID” (from the “Variable scope”).
- Firstname
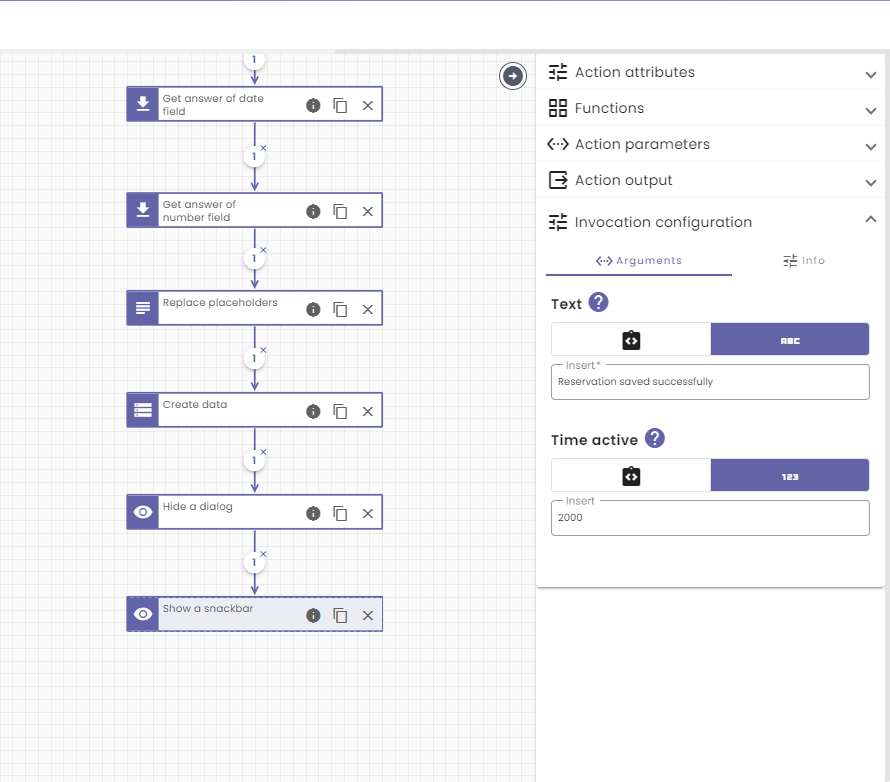
The only thing left for us to do, is make sure the reservation form closes after the date has been saved and the user gets a clear success message. Both these things are very easy to pull off.
To close the reservation form we will just close the dialog. We can use the function “Hide a dialog” for this which will simply close the dialog that’s opened at the moment.
- Open up the “Functions” section on the “Tool pane” and search for “Hide a dialog“.
- Drag and drop this into your action and hook it up as the last block.
- That’s all there is to it.
For showing a success message we can use a snackbar. We can simply use “Show a snackbar” and provide it with a message and an amount of milliseconds this snackbar should stay open.
- Open up the “Functions” section and search for “Show a snackbar“
- Drag and drop it into your action and hook it up as the last block
- Click on this block and open up the “Invocation configuration” section
- Text: “Reservation saved successfully”
- Time active: 2000 (Which means 2000 milliseconds).
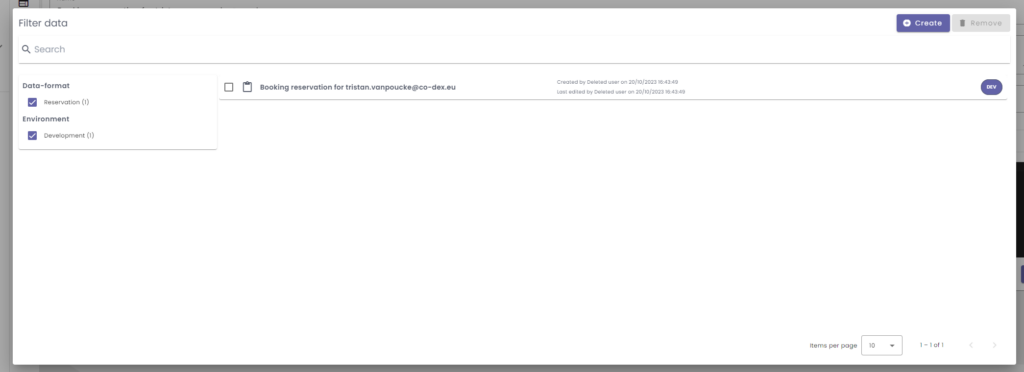
If all worked well, you can now create a reservation by testing your application and find it within the “Data” section of the NoCode-X editor. Tip: You can easily find this piece of data by using the filters to filter the “Data-format” and the “Environment”.
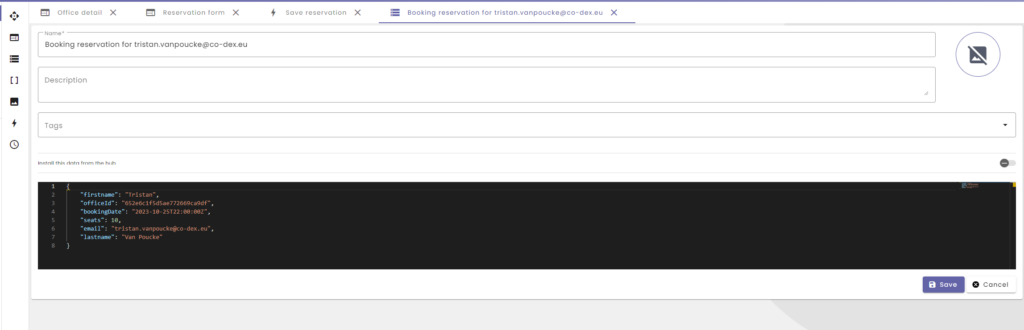
Opening up this piece of data, it should look like this:
Voila another piece of functionality done within our application! Care for more action? The next tutorial is a real treat! We will learn how to integrate with third party applications, check out: NoCode-Xcelerate: Integrating an office rental application with Mailjet.