


Today we will learn how to hook up any application you’ve built with NoCode-X with an external source through API’s. For the sake of this tutorial we will integrate a NoCode-X application with a Baserow database. We will create a set of actions that can be used across your application and will allow you to access your database without constantly repeating the technical details of accessing an API.
Baserow is an open-source no-code database tool that allows users to create and manage databases without the need for extensive coding or technical expertise. It provides a user-friendly interface for creating custom database applications and is designed to simplify the process of working with data.
Time to fly!
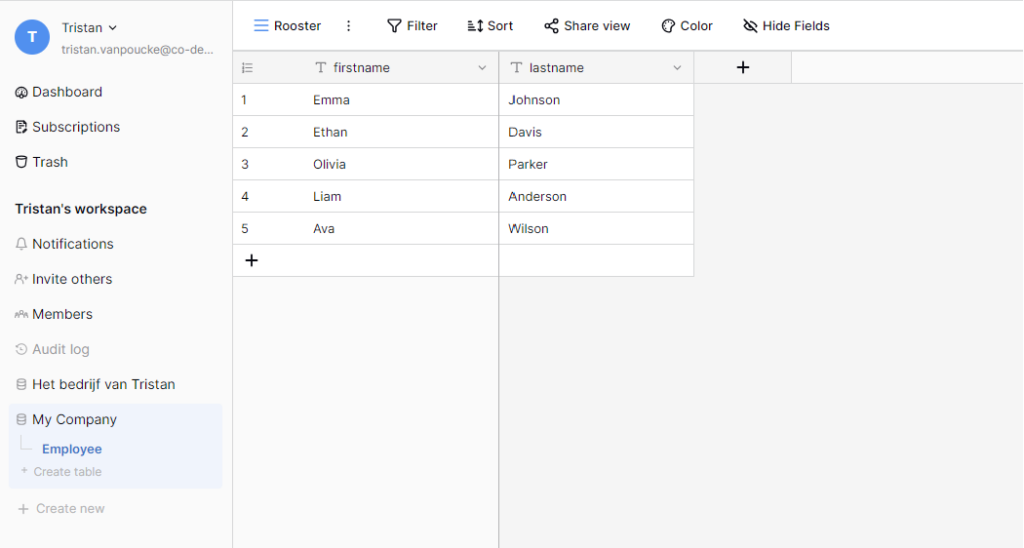
First thing we should do is create an account at baserow.io and create a database and an API key, start with this quickstart when you are not familiar with baserow. For this tutorial we’ve created a simple table: “Employees” with 2 fields: firstname and lastname and added some initial data to it:
Every database in baserow comes with an API which we can call to retrieve data from it or upload data towards it. That’s exactly what we will do. You can view generated API docs for your database by clicking on the three dots next to your company and then clicking on “API Docs”

On this page you get an explanation on how to access your API. For example an endpoint we can use to fetch a list of data from your table is:
https://api.baserow.io/api/database/rows/table/{{TABLE_ID}}/?user_field_names=trueWe also see that we have some parameters we can add for further filtering. Lets head over to NoCode-X and make it call this endpoint. First thing to do is store our API key in a safe space. We can leverage the data-classification system in NoCode-X to store our API key safely which will automatically encrypt this value and keep an audit trail of every read/write access.
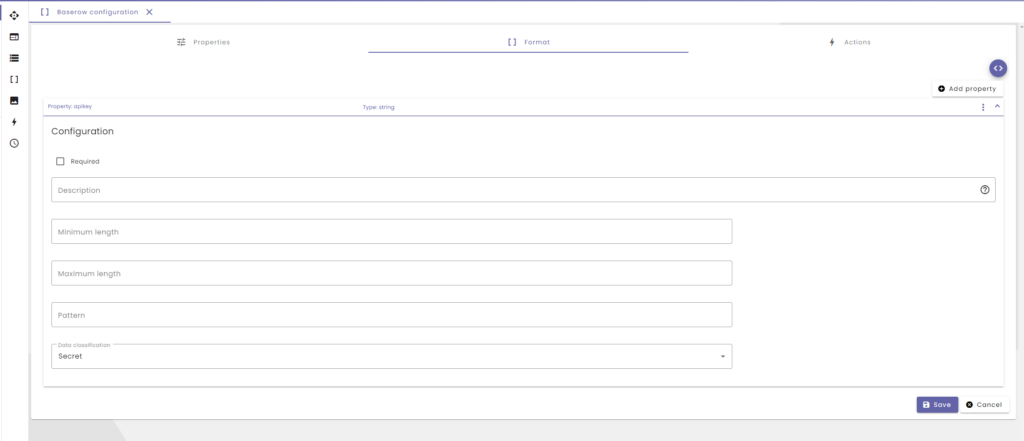
- Create a new data-format named “Baserow configuration”
- Open up the format-tab and add an attribute “apikey” with type string and classification “secret”.
Once we have this in place, lets make a piece of data using this data-format containing our API key.
- Open up the “Data” overview and create a new piece of data.
- Name it: “Baserow configuration”
- Choose “Baserow configuration” as Data-format.
- Add following body:
{
    "apikey": "<<YOUR API KEY>>"
}
Okay, now that we have our API key safely stored in our database we can instruct NoCode-X on how to make a call to our baserow API. Lets make an action and provide it with enough parameters making it reusable for other baserow tables/databases.
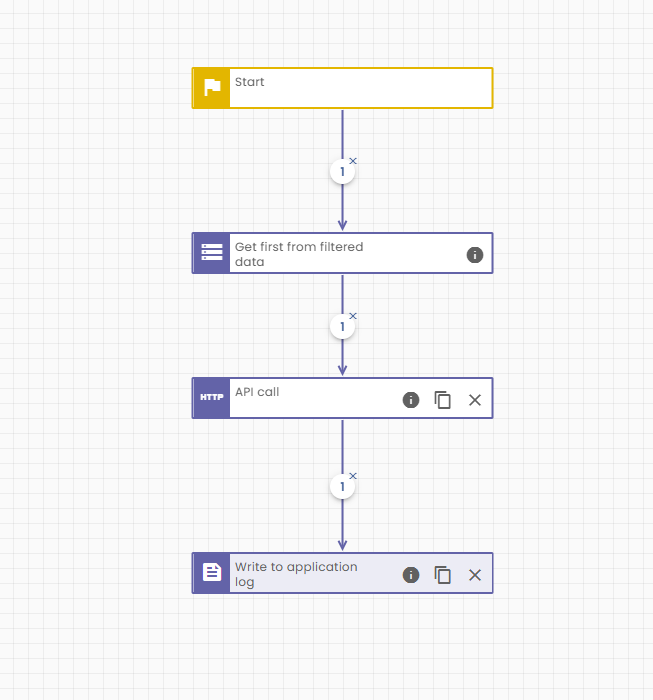
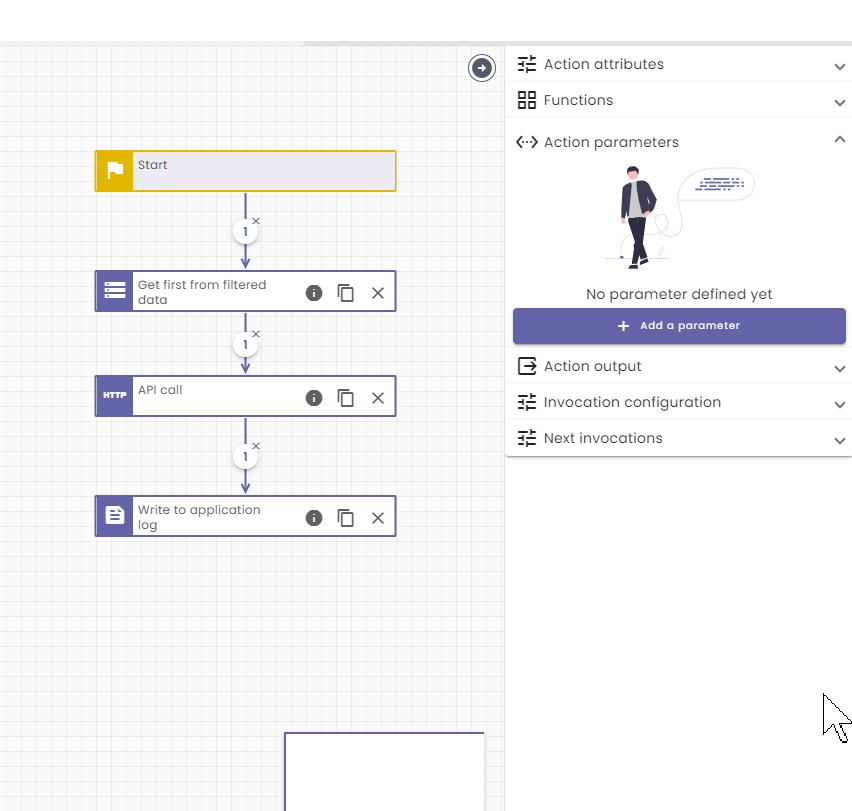
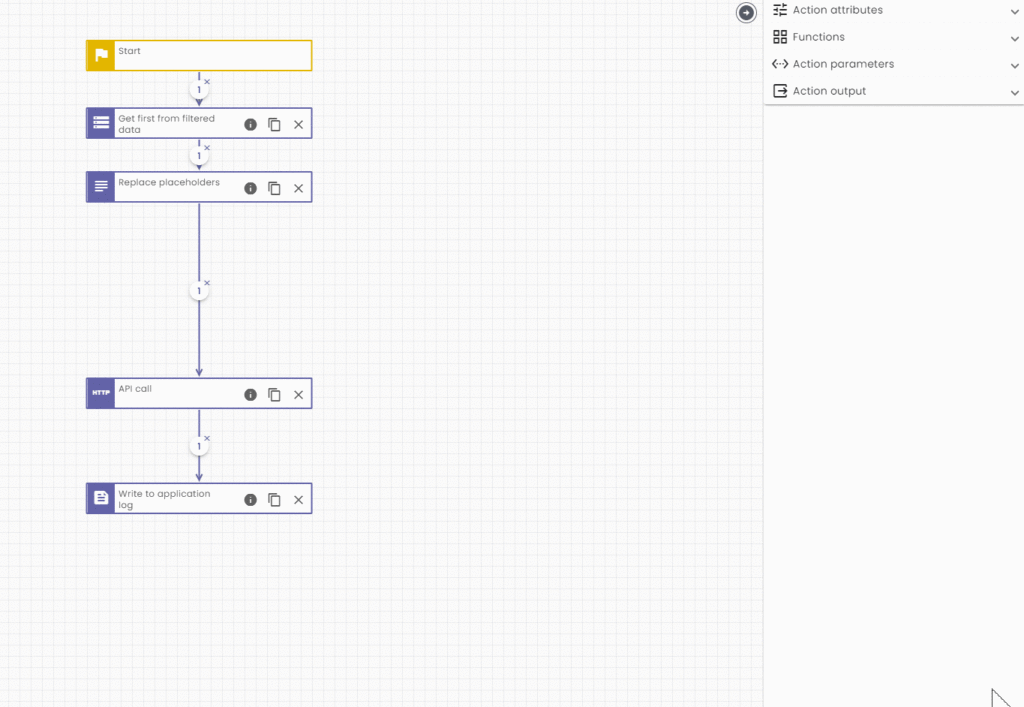
- Open up the “Actions” overview and create a new action.
- Name this action “Query baserow datalist”
- Open up the “Functions” section in the “Tool pane” and drag the following functions into your action.
- Get first from filtered data: This will get the first result of a data query on your built-in NoCode-X database. We will use this to fetch the API key.
- API call: This will perform the actual API call.
- Write to application log: We will use this to temporarily log the result of the query in the application logs.
- Hook them up as follows:
- Select the “Get first from filtered data” function and open up the “Invocation configuration“
- Select “Baserow configuration” as Data-Format and leave the other fields empty.
- Open up the “Result” tab and set “BASEROW_CONFIG” as “Found data”
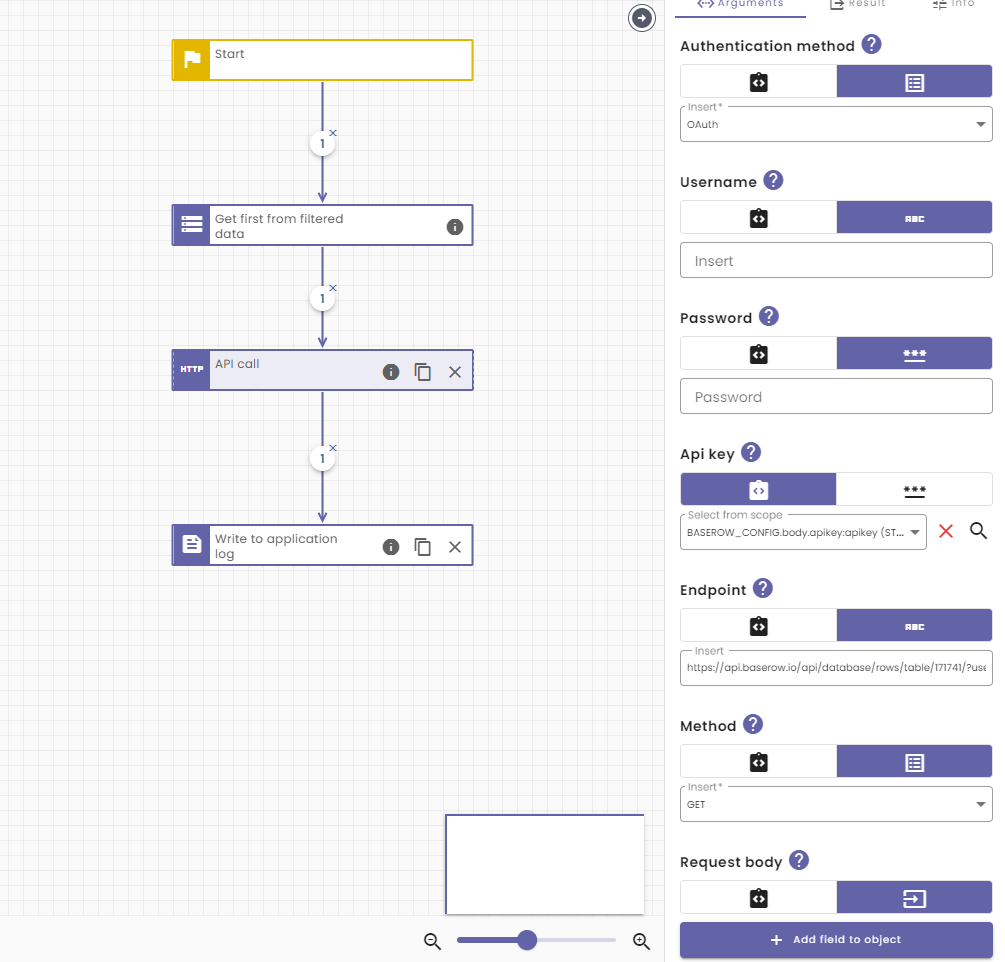
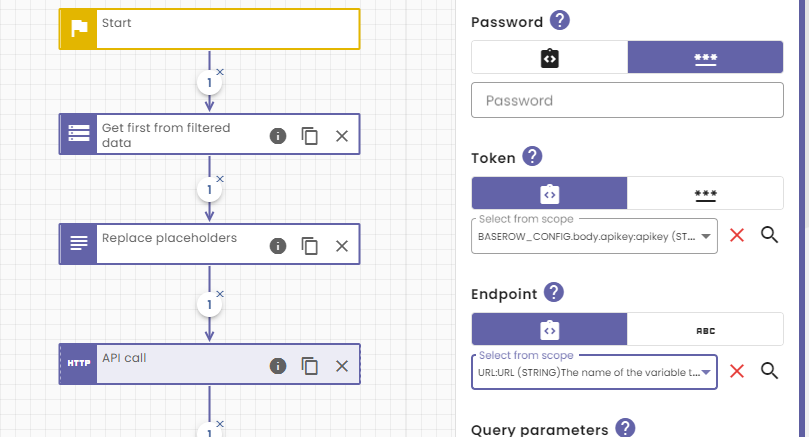
- Click on the “API call” function and open up the “Invocation configuration”
- Set the “Authentication method” to “API Token”
- For the “Token“, switch to the “Scope selector” and select “BASEROW_CONFIG.body.apikey” as value
- For the endpoint enter your baserow API endpoint, (don’t forget to replace TABLE_ID): “https://api.baserow.io/api/database/rows/table/{{TABLE_ID}}/?user_field_names=true”
- Set the method to “GET”
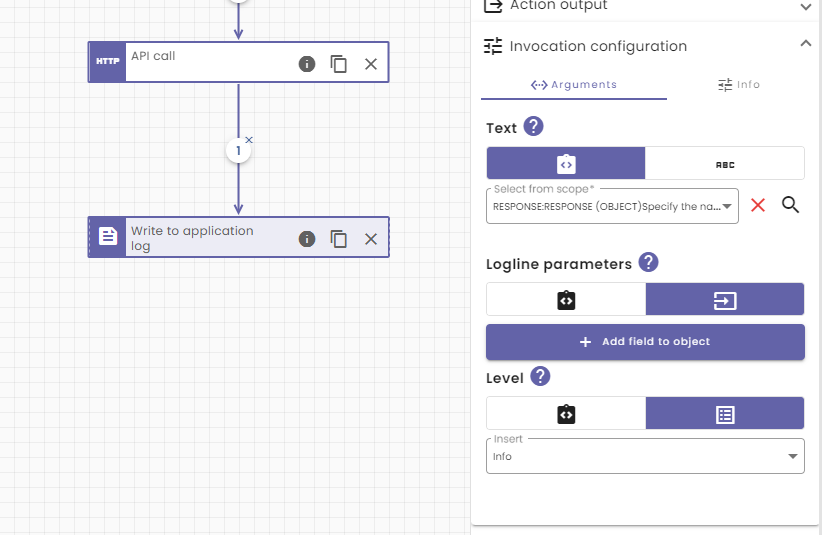
- Click on the “write to application log” function and open up the “Invocation configuration“.
- For “Text” switch to the “Scope selector” and select “RESPONSE” as value;
Voila, we have our action, now lets build a small page that allows us to easily test this logic.
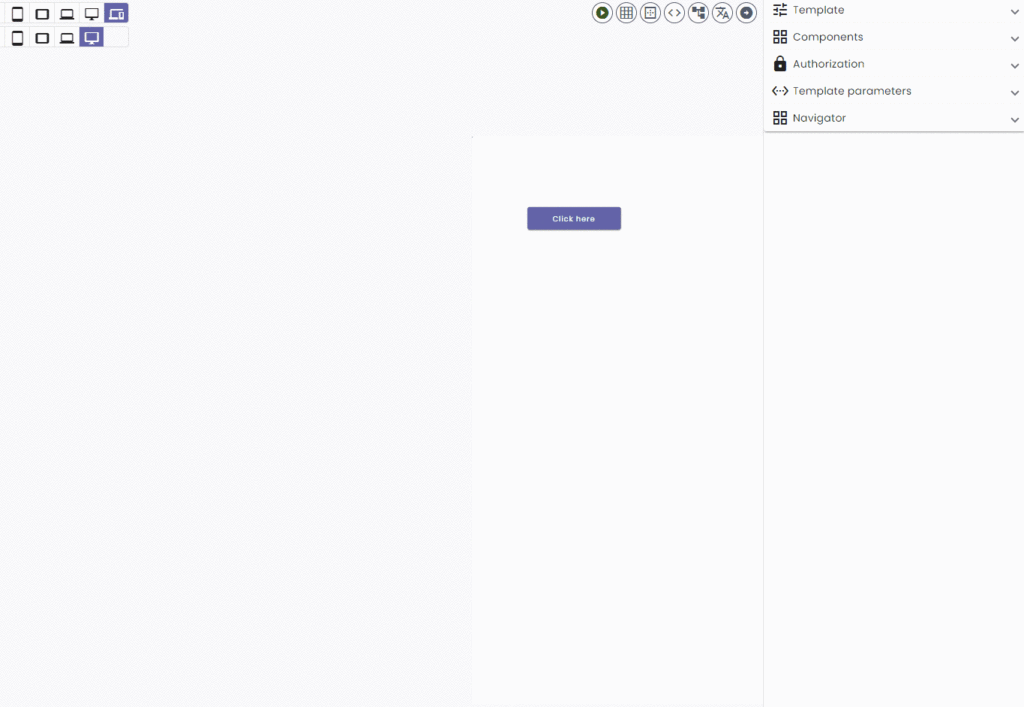
- Open up the “Templates” overview and create a new template.
- Call it “Tester”
- Disable authentication in the “Authorization” section
- Open up the “Components” section in the “Tool pane“
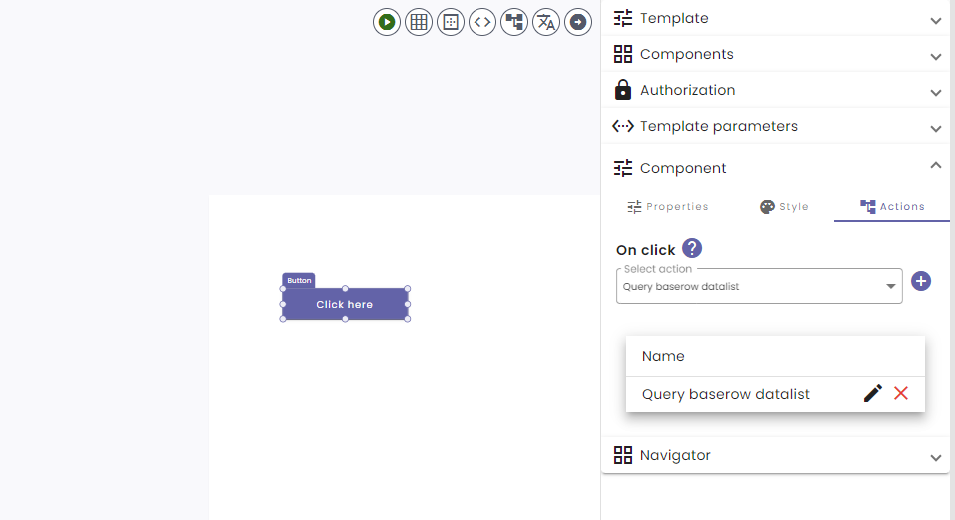
- Find the “Button” component and drag it onto your screen.
- Click the button component and open up the “Component” section in the “Tool pane“.
- Open up the “Actions” tab
- Search for “Query baserow datalist” and select it.
You can now preview this page by clicking the preview button. Click the “Click here” button and head over to the application logs by using the side navigation to see the results.

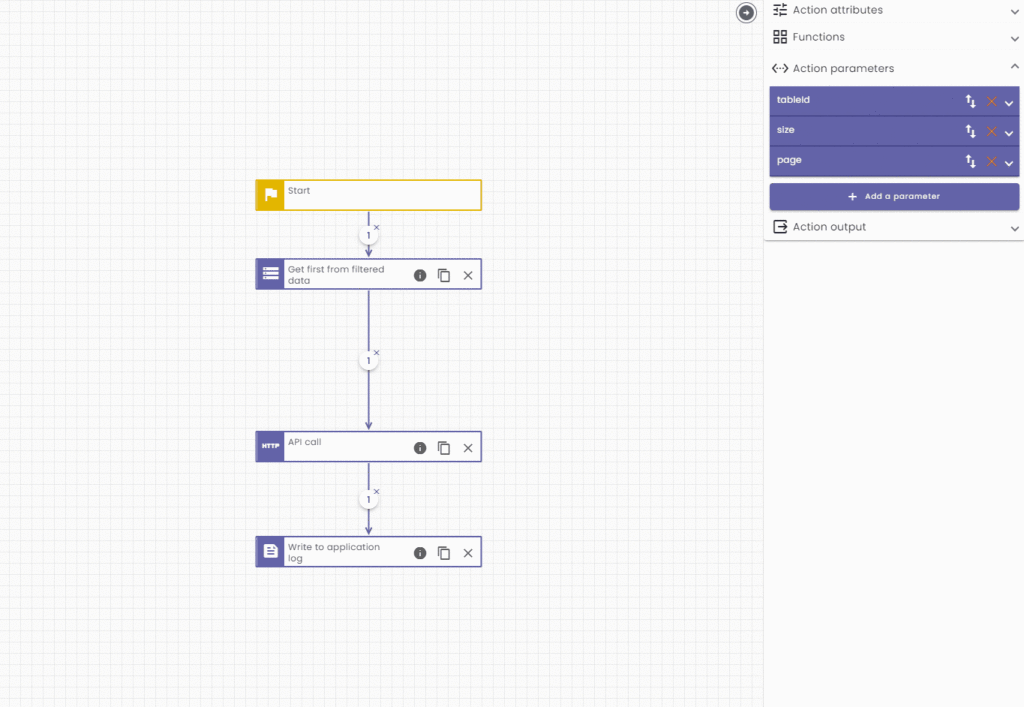
The names of our employees appear in the list. So our API Call works! That’s good but it would be great if we were able to reuse this action in the future. That way we would not have to worry about the technical details involved when accessing an API. Lets make our action a bit more reusable. Lets start by adding some parameters to filter our requests: tableId, page, size.
- Open up the “Query baserow datalist” action
- Open up the “Action parameters” on the “Tool pane“.
- Add the following parameters
- tableId:
- name: tableId
- type: string
- size
- name: size
- type: string
- page
- name: page
- type: string
- tableId:
Okay, we’ve created our parameters now lets use them. The tableId is a part of the url we need to call so lets construct the url before we execute the API Call. We can do this by using the “Replace placeholders” function. This will allow us to change the value “https://api.baserow.io/api/database/rows/table/{{TABLE_ID}}/?user_field_names=true” to “https://api.baserow.io/api/database/rows/table/171741/?user_field_names=true” for example.
- Open up the “Function” section in the “Tool pane“
- Find the “Replace placeholders” function and drag it into your action
- Hook it up in between “Get first from filtered data” and “API call” (tip: you can just drop it on the edge between those two blocks)
- Make sure “Replace placeholders” is selected and open up “Invocation configuration” in the “Tool pane“.
- Set the value of “https://api.baserow.io/api/database/rows/table/{{TABLE_ID}}/?user_field_names=true“
- Add a placeholder
- Name: “TABLE_ID”
- Value: Choose “tableId” from the variable scope
- Open up the “Result” tab
- Set the value of Result on “URL”
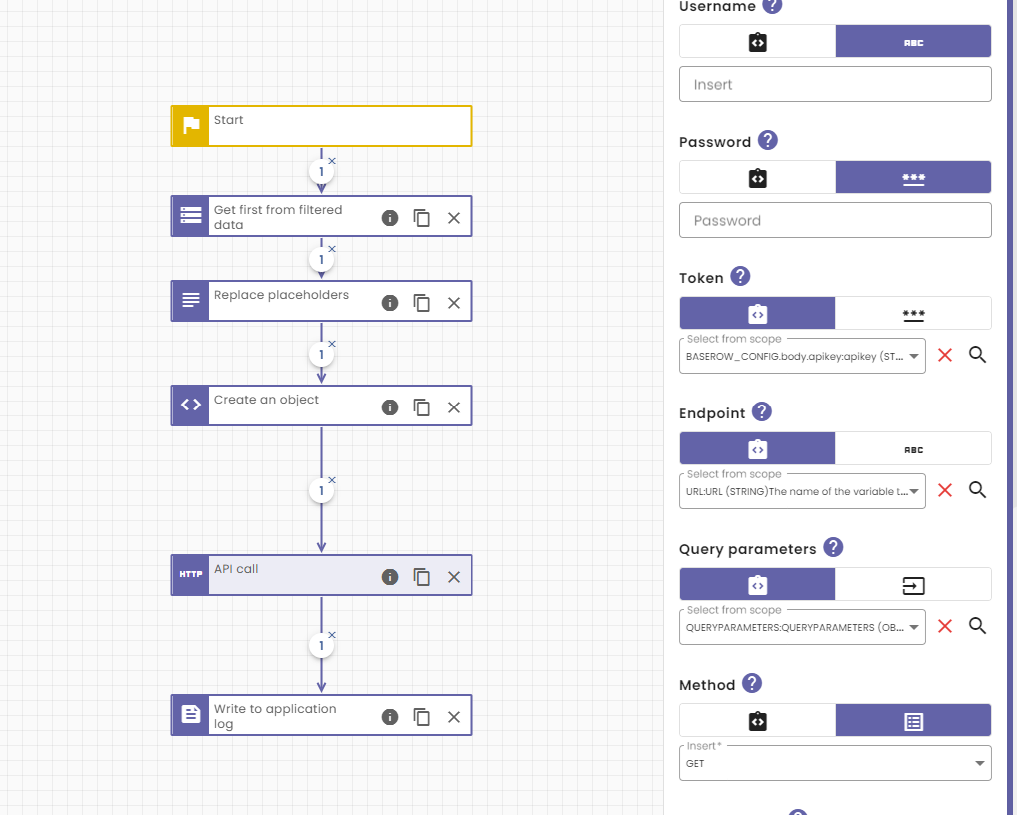
Now use this URL from the variable scope as the endpoint to call in the “API Call” block:
Now lets use the page & size parameters we defined on our action. The baserow API allows you to pass in query parameters with your call. We can pass in the “page” parameter to filter which page we want to fetch and we can pass in “size” to filter how many items we should fetch per page. We can just “translate” the parameters we defined in our action to the query parameters baserow expects. Lets do this by creating an “Object” and passing that object as the “Query parameters” of our API call.
- Open up the “Functions” section of the “Tool pane“
- Find “Create an object” and drag it into your action (after “Replace placeholders“
- Make sure “Create an object” is selected and open up “Invocation configuration“.
- Add the following fields to your object
- size
- name: size
- value: choose “size” from scope
- page
- name: page
- value: choose “page” from scope
- size
- Open up the “Result” tab and set “QUERYPARAMETERS” as “Object variable name“
Now all we have to do is use the variable “QUERYPARAMETERS” in our API Call.
- Make sure the “Api Call” block is selected
- Open up the “Invocation configuration” in the “Tool pane“
- Switch to the “Scope selector” for “Query parameters” and select “QUERYPARAMETERS” from the scope.
Okay, this is a little more reusable and flexible. Lets create a small action where we execute our “Query baserow datalist” action and provide it with some values for the parameters we have created.
- Open up our test template
- Click on the button
- Open up the “Component” section in the “Tool pane“
- Open up the “Actions” tab
- Remove the action that was linked there “Query baserow datalist”
- Add a new action by clicking the “+” button.
- Click the “pencil” button to edit this new action
- Open up the “Action attributes” section in the “Tool pane” and give this action a descriptive name “My test action“
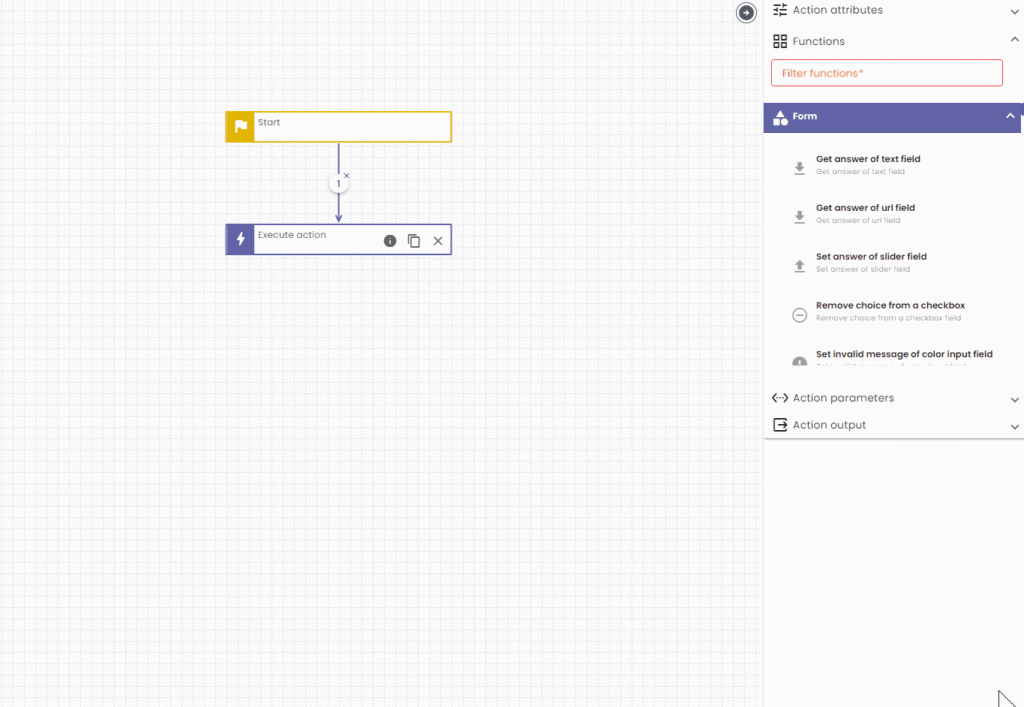
- Open up the “Functions” section in the “Tool pane” and find the function: “Execute action“
- Drag and drop this function into place and hook it up to the “Start” block
- Select “Execute action” and open up the “Invocation configuration”
- Set “Query baserow datalist” as Action and the parameters we’ve created should now appear as input fields.
- Set your tableId value
- Set the size to 3
- Set the page to 1.

As you can see, you now get the first 3 results back from your database. That’s great, we can now tweak the values of the parameters to get other results. However, the result of this query is not available in “My test action”, it is available in “Query baserow datalist” obviously because that’s where we write the results to the logs. Within NoCode-X every action can have several “Output” values. These values will then be placed on the variable scope of the calling action making them available to use within that action. You can easily define those “Output” values, lets do it for “Query baserow datalist“.
- Open up “Query baserow datalist” action.
- Open up the “Action output” section of the “Tool pane“
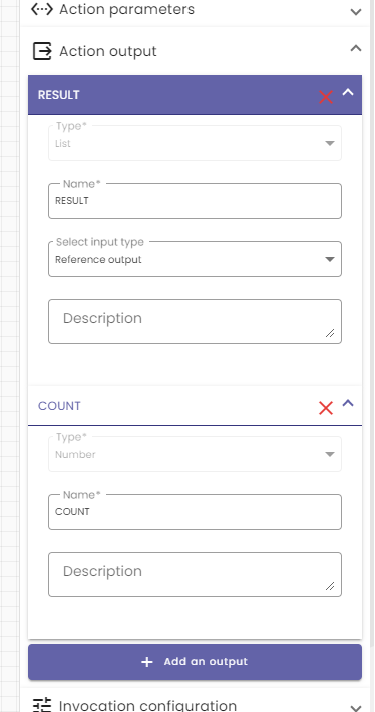
- Create the following “Output” values
- Result
- Type: List
- Name: RESULT
- Select input type: Reference output
- Count
- Type: Number
- Name: COUNT
- Result
The “Output” values work by searching the variable scope for variables that have the same name as the “Output” values at the end of executing an action. When these variables are found they are placed on the variable scope of the calling action. Thus we need to make sure that there are variables in the variable scope of “Query baserow datalist” with the names “RESULT” and “COUNT”.
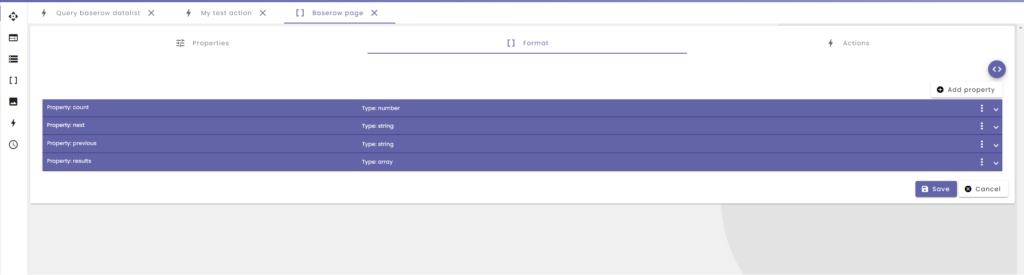
Baserow answers API calls by giving a somewhat standard response. They include: count, next, previous & a list of results in their RESPONSE. Lets create a data-format resembling their response making it possible for us to reason with in our actions.
- Open up “Data-format” overview and create a new dataformat
- Name it “Baserow page”
- Open up the “Format” tab and add the following properties
- count
- name: count
- type: number
- next
- name: next
- type: string
- previous
- name: previous
- type: string
- results
- name: results
- type: array
- count
- Head back to the “Query baserow datalist” action
- Select the API call block
- Open up the “Invocation configuration” section in the “Tool pane”
- Open up the “Result” tab
- Set “baserow page” as “Response format“.
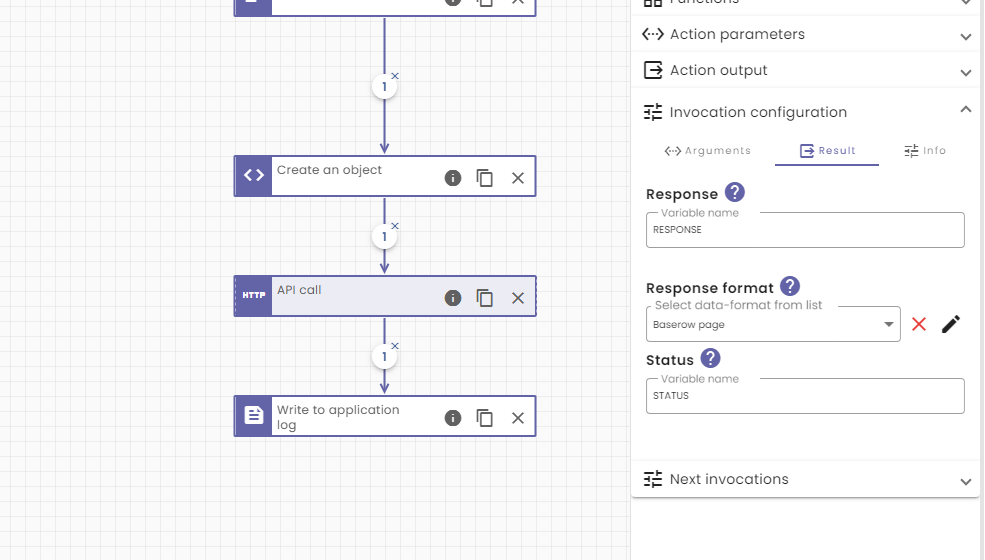
This tells our editor that the response of this API call is formatted accourding to the Dat-format we’ve created. Now we can reason with the response from baserow in our action. Lets use this to set the necessary values in our scope so they can be picked up as “Output”. We can use 2 functions for this “Store number in scope” and “Store list in scope”. Lets add them to our action.
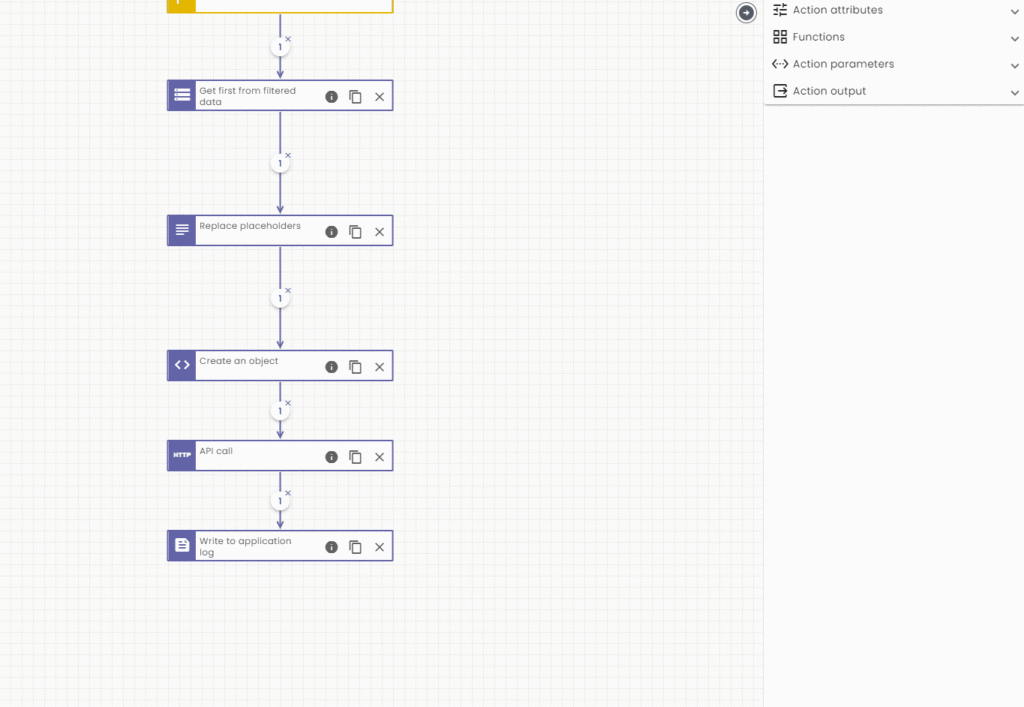
- Open up the “Functions” section of the “Tool pane“.
- Search “Store number in scope” and add it to your action.
- Search “Store list in scope” and add it to your action.
- Hook them up as the last blocks in the sequence.
- Select “Store number in scope” and open up “Invocation Configuration“.
- Switch to the “Scope selector” and set “RESPONSE.count” as value.
- Open the “Result” tab and set “COUNT” as result.
- Select the “Store list in scope” and open up “Invocation Configuration“.
- Switch to the “Scope selector” and set “RESPONSE.results” as value.
- Open the “Result” tab and set “RESULT” as result.
- Finally remove the “Write to application log” block.
Lets use this in “My test action” by writing out the count in the application logs and by looping over the results, writing the firstname of the employee in the application logs. We can use the Function “For each” to do so. But first we must create another “Data-Format” this one will be used to represent the data that is actually in our baserow database, our employee data.
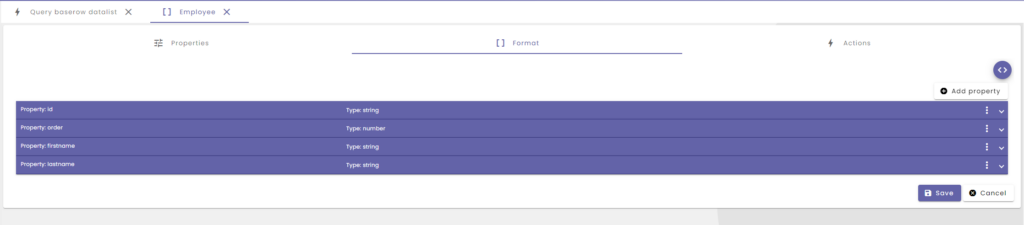
- Create a new Data-Format called “Employee”
- Open up the “Format” tab
- Add the following properties
- id
- name: id
- type: string
- order
- name: order
- type: number
- firstname
- name: firstname
- type: string
- lastname
- name: lastname
- type: string
- id
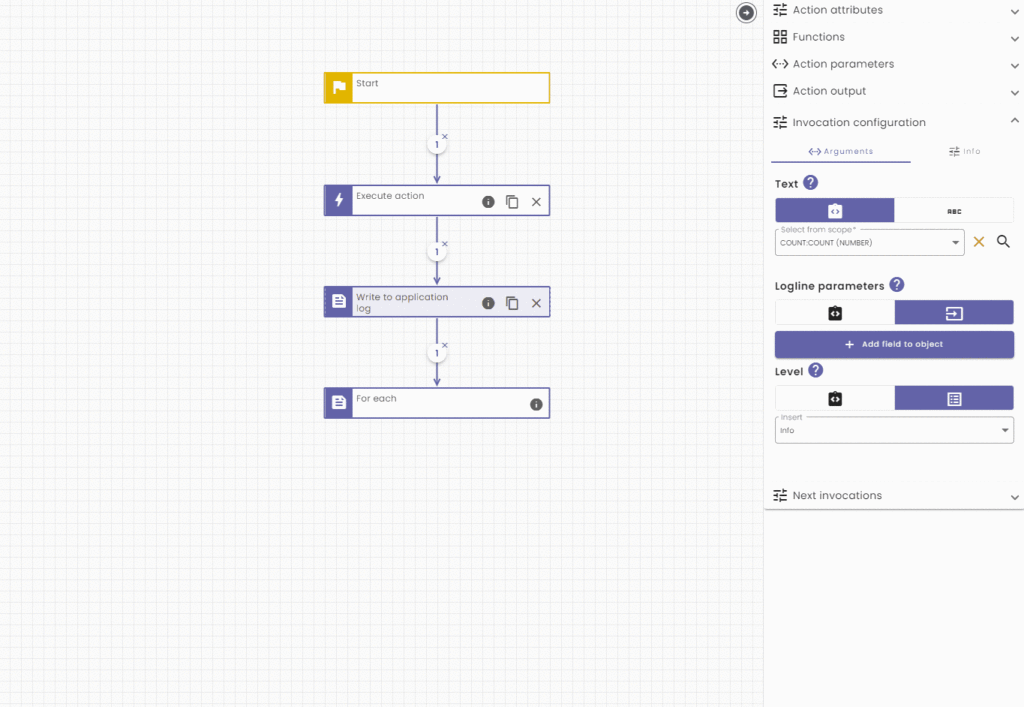
- Head back to “My test action”
- Open up “Functions” section in the “Tool pane“
- Search for “Write to application log” and drag in into your action
- Search for “For each” and drag it into your action.
- Hook them up as the last blocks in the action.
First we will have to let NoCode-X know under what names the Output data of our “Query baserow datalist” should stored within the Variable scope of our “My Test action”. We can do so by setting the names in the result tab of the “Execute action” block. It is important that we do this, because otherwise collisions with already existing variables could happen. So we have to make sure we let the outputs be written to variables that do not exist yet.
- Select “Execute action” and open up the “Invocation configuration“
- Open up the “Result” tab
- Set the value of RESULT to RESULT
- Set the value of COUNT to COUNT
- Select “Write to application log” and open up “Invocation configuration“
- Set the value “COUNT” from the scope selector as “Text“
The “For each” function executes an action exactly once for each item of a certain list. So if you have a list of 3 employees for example. This function will execute a certain action 3 times. The item (the employee for example) of current iteration is passed along as the value of a parameter. Of course this parameter has to exist on the action. Lets configure the “For each” block.
- Click on “For each” and open the “Invocation configuration“
- Set “RESULT” from scope as the “List“
- Set Item name to “EMPLOYEE”: This is the name of the parameter of the inner action.
- Click the “+” next to the action input field.
- A new action is opened
- Open up the “Action parameters” in the “Tool pane“
- Add the following parameter
- EMPLOYEE
- name: EMPLOYEE
- type: Object
- inputtype: Data-format
- Data-format: Employee
- EMPLOYEE
Now all that remains is to write the name of our employees in the application log, in the newly created action:
- Open up the “Functions” section in the “Tool pane“
- Search for “Write to application log“
- Drag and drop it into your action.
- Choose from the scope selector “EMPLOYEE.firstname” as value for “Text“.

We can see that we have 4 messages in our logs. The total amount of employees in our database followed by the names returned by the baserow api. You can see how you can easily use our “Query baserow datalist” to retrieve data from all your tables within baserow, simply by passing another tableId and by using another data-format.
Just like that we’ve created a nice reusable action that we can use within our application or across applications by publishing it to our private or even public Hub.
Ready for more action? Check out: NoCode-Xpert: Building a reusable REST api call #2 where we will continue our work by adding filter, search & order capabilities!