


Let’s continue our work from the previous tutorial. If for some reason you haven’t completed the previous tutorial we encourage you to do so. If however you want to start with this tutorial, no problem you can easily get the resulting application of the previous tutorial from “The Hub” by installing “NoCode-Xcelerate #1”.
In this tutorial we aim to create a paged overview of available offices for rent. We will do this by leveraging the “Vanilla overview” plugin that can be installed from “The Hub” and combining this with a custom format for office data.
First, lets talk data
To work effectively with data within NoCode-X, the first step is to establish a data-format. Think of a data-format as a blueprint for structuring each piece of data within NoCode-X. This data can be used within the built-in storage or in memory during execution of nocode logic.
- Open up the “Editor” by using the sidenavigation.
- Open up the list of “Data-format” either by clicking on the “Data-format” button or by using the shorcut “Alt + f“.
- Within the overview of “Data-formats” click on create.
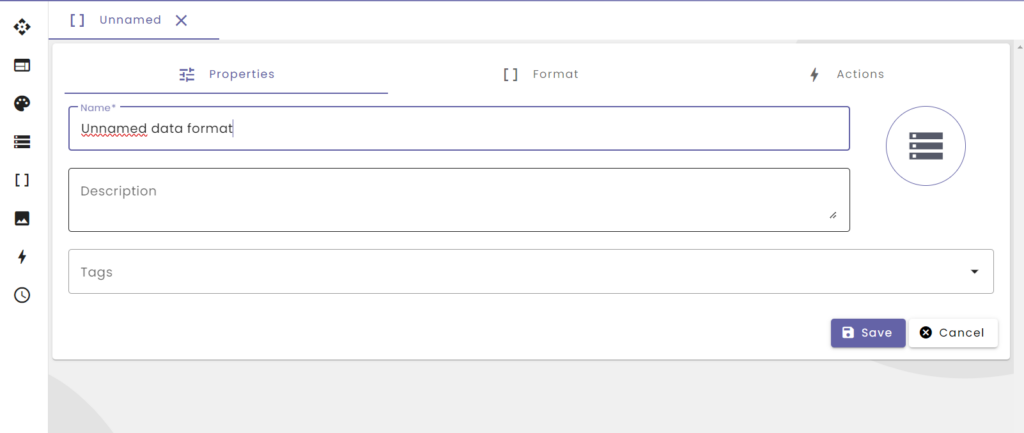
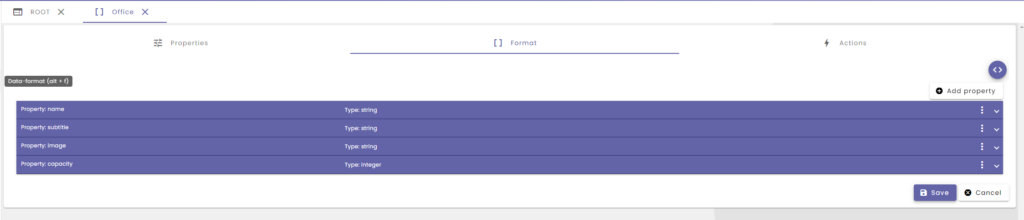
We need to create a “Data-format” to represent our “Office” data. For now lets create offices with a name, subtitle, image & the total capacity.
- Give the Data-format a descriptive name “Office“.
- Optionally give it a description & choose an icon to enhance its recognizability.
- Open up the “Format” tab
- Click on “Add property“
- Name: name
- Type: string
- Click on save
- Click on “Add property“
- Name: subtitle
- Type: string
- Click on save
- Click on “Add property“
- Name: image
- Type: string
- Click on save
- Click on “Add property“
- Name: capacity
- Type: integer
- Click on save
- Don’t forget to click on “Save” to save the entire Data-Format
Now that we have our dataformat setup, it’s time to create some offices in our built-in database.
- Open up the overview of data by clicking the data button or using the shortcut “ALT + d“.
- Click “Create“
- Name our piece of data “Corporate Headquarters”
- Choose “Office” as the dataformat
- Keep environment at “Development“.
- A black input box appears where you can enter JSON data.
Add the data below, and repeat the above process for every JSON listed below. As you can see we predefined the image url for you. In subsequent tutorials we will showcase how to properly point to media in the media-library & enjoy extra maintainability & features such as automatic resizing. But for now we can just use the images we provided and hosted for this tutorial.
{
    "name": "Corporate Headquarters",
    "subtitle": "The central office for our global operations",
    "capacity": 500,
    "image": "https://back.nocode-x.com/v2/media/file/company/6f3fa3cf-2c53-474f-912b-8b4109f59f7b/application/ae25edf4-541e-4cfb-a13c-680b5ecb98ff/3b496425-9306-425c-8f83-276626df7205"
}
{
"name": "Downtown Workspace",
"subtitle": "Modern office space in the heart of the city",
"capacity": 75,
"image": "https://back.nocode-x.com/v2/media/file/company/6f3fa3cf-2c53-474f-912b-8b4109f59f7b/application/ae25edf4-541e-4cfb-a13c-680b5ecb98ff/40d99ab1-596f-4706-8fcd-571c5c1f5455"
}{
"name": "Green Oasis Office",
"subtitle": "An eco-friendly office space surrounded by nature",
"capacity": 30,
"image": "https://back.nocode-x.com/v2/media/file/company/6f3fa3cf-2c53-474f-912b-8b4109f59f7b/application/ae25edf4-541e-4cfb-a13c-680b5ecb98ff/3984f277-b0dd-4d93-b238-c0876ea3d332"
}{
"name": "Tech Hub",
"subtitle": "Cutting-edge tech office with collaborative environment",
"capacity": 150,
"image": "https://back.nocode-x.com/v2/media/file/company/6f3fa3cf-2c53-474f-912b-8b4109f59f7b/application/ae25edf4-541e-4cfb-a13c-680b5ecb98ff/96dea45c-a266-4631-b894-f84281a3a9d0"
}{
"name": "Cozy Corner Office",
"subtitle": "Small but comfortable office with a view",
"capacity": 10,
"image": "https://back.nocode-x.com/v2/media/file/company/6f3fa3cf-2c53-474f-912b-8b4109f59f7b/application/ae25edf4-541e-4cfb-a13c-680b5ecb98ff/fdbceb8e-213e-47a4-b05f-ec89e8b7112c"
}{
"name": "Startup Innovators",
"subtitle": "Dynamic and creative office for innovative startups",
"capacity": 50,
"image": "https://back.nocode-x.com/v2/media/file/company/6f3fa3cf-2c53-474f-912b-8b4109f59f7b/application/ae25edf4-541e-4cfb-a13c-680b5ecb98ff/78034b7f-449a-4f7f-bfc6-05ff586d479a"
}Let's get crackin'
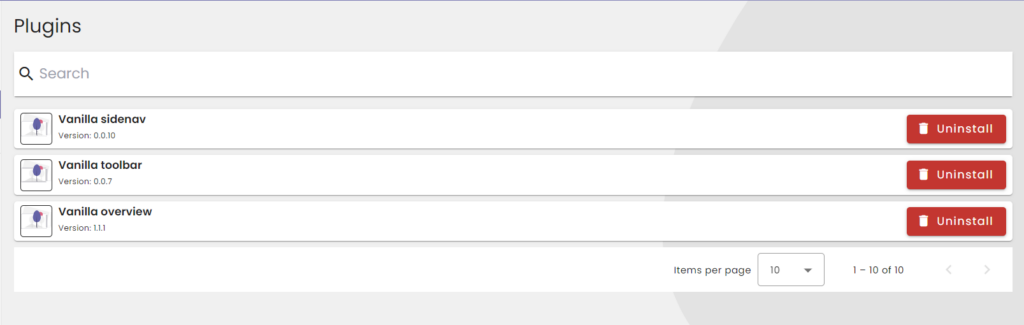
Lets begin by designing our office overview page. This page will display 3 offices and allow our users to browse through the entire database of offices page by page. We will use the plugin “Vanilla overview” which can be installed from “The Hub“:
- Head over to “The Hub” and install “Vanilla overview” plugin.
- After this install is completed you should have 3 installed plugins (or 2 plugins in case you’ve skipped the first tutorial and installed “NoCode-X Xcelerate #1″) in your application.
Now lets use this plugin, much like we’ve used the sidenav plugin and the toolbar plugin in tutorial #1.
- Head to the “Offices template”
- Remove the “Title” component containing the “Hello world” text by right clicking on it and then clicking “Delete“.
- Open up the “Components” section in the “Tool pane” and find the “Template” component.
- Drag and drop it into your page, make sure this component is selected.
- Open up the “Component” section in the “Tool pane”
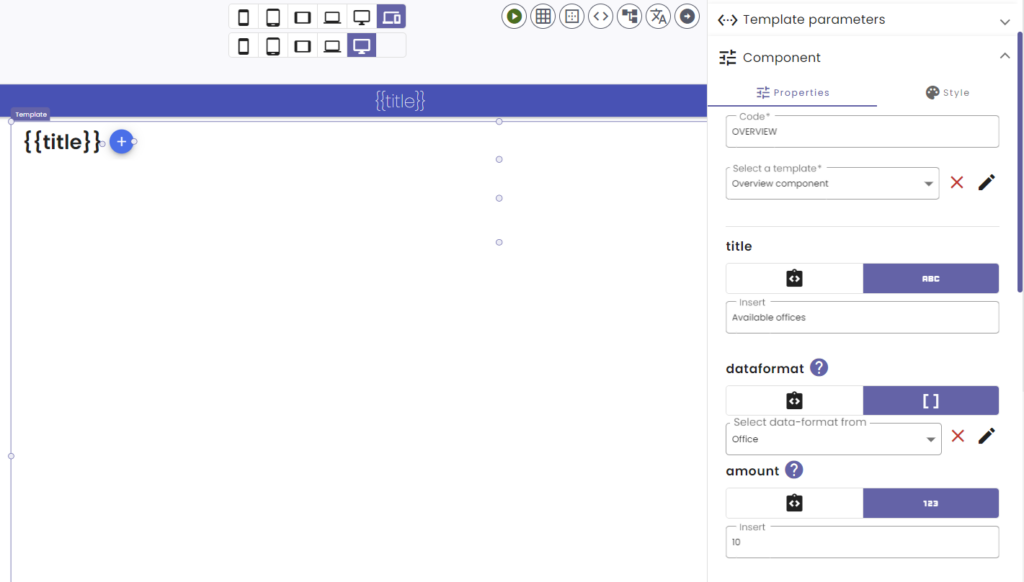
- Provide a descriptive and unique code such as “OVERVIEW“
- Open up the “Style” tab
- Size your component
- Width: “10 grid”
- Height: “100 %”
- Position your component
- x: “2 grid”
- y: “60 px”
- Open up the “Properties” tab
- Select “Overview component” as the template
- Set the title parameter to “Available offices”
- Set the dataformat parameter to “Office“
- Set the amount parameter to 3
- Set the orderBy parameter to “name”
- Set the orderByOrder to ascending
- Set the showAddButton to false
- Set the NoResultTemplate to “Overview no results found“.
What this will do is fetch a paged list of data created using the “Office” data-format from the built-in database & visualize them in an overview. How each item should be visualized is determined by picking a template for “itemTemplate“. You can create one yourself or just adjust the “Overview item” template that comes with the “Vanilla overview” plugin. For the sake of this tutorial we will do the latter.
- Open up the “Template overview“.
- Select the checkbox next to “Overview item“
- Click “Copy“
- Open “Overview item (copy)”
- Rename it to “Office overview item”
You will notice that there are already several components in place. We can use some of them to quickly create our own version. We will set some of the values of these components to placeholders. Placeholders are replaced with real data at runtime. Placeholders can be used as value of components within templates and they always start and end with double curly brackets. Whats inside those curly brackets is the path of the data to be replaced. In our case we will fetch a piece of data from the built-in database and call it “DATA”. Data from our database always has default attributes such as, id, createdBy, creationDate, etc… and a body which represents the actual data like the JSON we have saved for our offices. We will use the data within this body during this tutorial.
- Select the image component and set the Url to: {{DATA.body.image}}
- Select the component containing “{{DATA_TITLE}}” and change the title value to “{{DATA.body.name}}
- Select the component containing “{{DATA_SUBTITLE}} and change the title to {{DATA.body.subtitle}}
- Remove the component containing “{{DATA_META}}

We encourage you to play around with the numerous styling options an grasp the endless possibilities NoCode-X offers when it comes to designing pages. You could for example change the style of the image a bit:
- Select the image component
- Open up “Component” section in the “Tool pane“
- Open up the “Style” tab.
- Size the image component
- Width: 70 px
- Height: 100%
- Position the image component
- x: 0 px
- y: 0 px
- Remove all border styling by hitting the “reset” button.
- And move the titles a couple of pixels to the right or else they will overlap with the image.
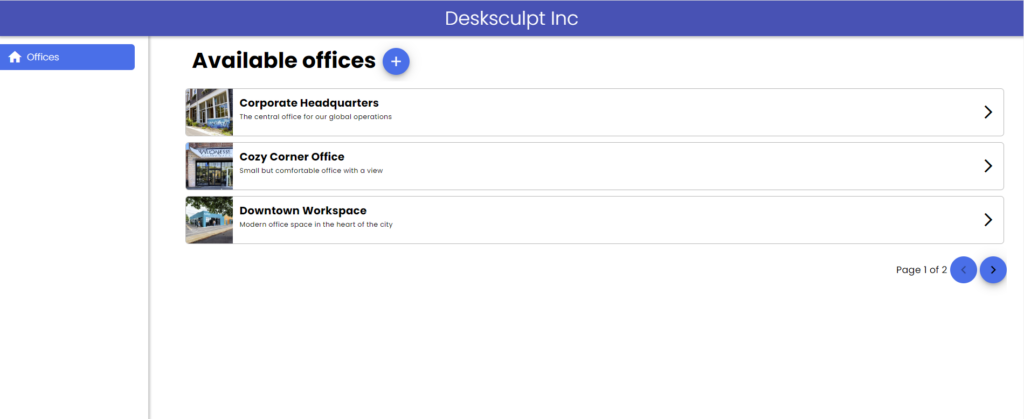
Now, head over to the “Offices template” template set the “Office overview item” template as the “ItemTemplate” in the overview component and click the preview button. If went all went good, we should have an overview with three offices per page.
And just like that our application has gotten a little more content. Care for more action? Check out the next tutorial: NoCode-Xcelerate: An detail page for offices
Did you notice that all plugins used within this tutorial were built by using NoCode-X? That’s right no code was used to build these plugins want to learn how to build plugins check out these tutorials:
- NoCode-Xpert: Building a reusable overview component